Search

The Home That Yard Sales Built

How to conquer life's obstacles one bargain at a time!

In Memory of My Grandma or: LIFE’S SHORT: EAT THE PIE

(Grandma Beck and me adoring one another.  It never faded.)

On Thanksgiving Day, 2013, my maternal grandmother, Wanna Lillian Nester (known to everyone as Beck), slipped away from this life in the wee hours of the morning.  She died quietly, but she most certainly didn’t live that way.  She put a lot under her belt:


94 years, 10 months.

Nine siblings.

One husband.

Two daughters.

Two granddaughters.

One great-granddaughter.

Seventeen presidents.

Over 4,000 pies (and that’s a VERY low ballpark figure.)

One wicked sense of humor.

and

Millions and millions of memories.

I am of the opinion that my grandmother loved few things more than feeding people.  I have had many a bloated belly that can attest to that.  Countless guests have sat in her kitchen, nearly foundered, only to hear:  “Weeeell…you’ve hardly touched your pie.”

I loved watching my Grandma Beck cook.  Not as much as I loved eating what she made, mind you, but it ran a close second.  I’m lucky enough that she taught me to make a handful of her favorites.  But, what my grandma taught me was about much more than just cornbread (or pies), it was about taking care of people, about showing people that they’re special.

Screen shot 2013-12-09 at 11.29.51 PM

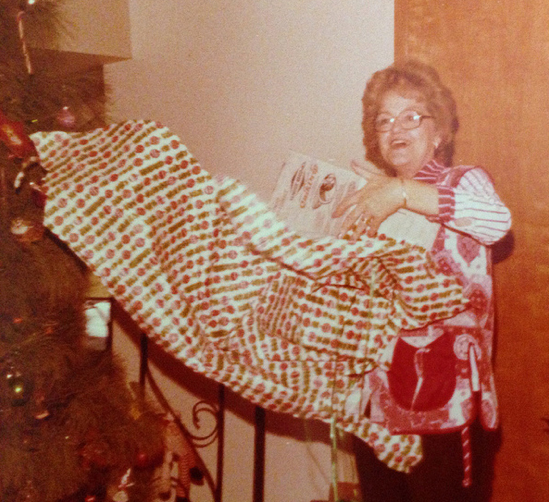
(Grandma Beck giving me pie crust pointers, and making me laugh, New Year’s Eve 2011.)

She certainly made me feel special.  Her love for me was powerful and unconditional.  It wasn’t complicated, or riddled with caveats…she simply loved me.  No.  Matter.  What.  I knew that she ALWAYS had my back.  She would have fought a grizzly bear (and I would wager good money she would have won) to save me from even a moment of discomfort.  She made me feel brave; because she was brave.

Grandma Beck loved Wheel of Fortune, she loved her faith, she loved tostadas, she loved complaining about trees that drop too many leaves (or other such trivial irritations), she loved cooking and baking for others (have I mentioned pie?), she loved getting dressed up, she loved being silly with her family, if her upstairs bathroom was any indication she was fond of decorative soap (although I never talked that one through with her), she loved snow, she loved her tiny glass and porcelain shoe and pocket knife collections,  she LOVED Christmas more than anyone else I’ve ever known, and for a period of time she was deeply enamored with Pillsbury Toaster Strudel.

(Grandma Beck 1970 something…thrilled about what appears to be some sort of kitchen appliance…her enthusiasm was so genuine.)

She hated being far away from her family, she loathed Richard Dawson (“Ugh.  There’s old kissy face” she would say through a grimace every time she saw him on TV),  wouldn’t tolerate haircuts that showed her ears, had a lifelong animosity toward ill-fitting shoes due to her impossibly narrow feet (“My foot slides forward!” she said more times than I can count), harbored resentment toward quite a few politicians (who will remain nameless), couldn’t stand low-cut tops (“Are you a-goin’ out in THAT?” I heard more than once), simply would not abide Christmas decorations that were up past December 25th, and was never known to enjoy being told what to do.


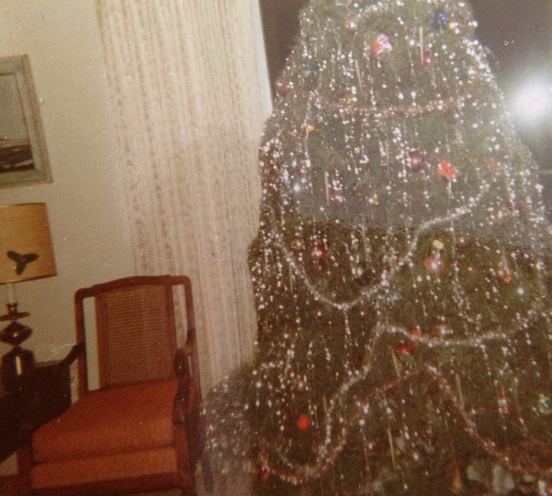
(This poor tree didn’t know that certain death was around the corner.  It’s lucky it made it past midnight Christmas Day.)

But you know what she loved more than she loved OR hated any of those things?  Me.  My cousin.  My mother.  My aunt.  Everyone in her vast circle of family and friends.

Grandma Beck was generous, funny, prideful, loving, judgmental (sometimes hilariously so), compassionate and kind.  She didn’t just walk, she sashayed.  Her smiles were contagious.  She was ornery (she loved pranks), adorable, sometimes impatient, steadfast and loyal.  She had the ability to get away with just about anything she wanted and by all accounts should have behaved as if she was spoiled rotten but she didn’t.  She never complained about or shied away from hard work.  She was unabashedly feminine (with a love for all things sparkly), and she was tough as nails.  She was resourceful.  She was a lot of things I aspire to be, and her foibles were ones that were easy to forgive.  She would give you the shirt off of her back, but if she wanted her way, she was getting it.  Somehow ALL of it was endearing.  She charmed everyone she met instantly.

 Listening to the comments, condolences and reminiscences from those who knew my grandma, I heard certain sentiments again and again.  Many people commented on her cooking and baking, her wit, her encouraging nature, about how she was always laughing and smiling, about how she was beautiful and always smartly dressed, among many other things.  But the thing that struck me most deeply was just HOW many people who weren’t in her immediate family thought of her as THEIR grandmother/mother/aunt.  They considered her family by choice.  They loved her, and she loved them back.  Not with a tiny part of her heart…with all of it.

We have a limited amount of time here on this spinning blue and green globe.  Every day we wake up with the opportunity to make a difference.  To make someone smile.  To make someone’s life better in some way, big or small.  To love them completely and fearlessly.  To make them a pie…and to give them a larger slice than you take for yourself.  My grandma was on this planet for 34,554 days, and in my humble opinion, she did good work in the generous amount of time she was allotted;  she made a difference.

Grandma Beck had a habit of, after finishing a particularly trying chore or an eventful day, arriving home after a long trip, or some similar activity, of exhaling and saying through the exhale:  “Wheeeee.”  It occurs to me that this funny little habit was so appropriate for her. It’s as if she was saying:  “Well, that was EXHAUSTING…but you know what?  It was FUN.”  I imagine, in some ways, that’s an apt description of her life as a whole.  Why?  Because she decided to smile and laugh, even during times when anything other than stomping her feet must have been difficult.  She was so resilient.

My heart ACHES to feel her arms hugging me again, to hear her laughter and see her smile, but she’s somewhere else now.  She’s probably trying on halos:  “Well, now this one would be ok, but it keeps sliding forward.” she’s probably saying to the (hopefully patient) angel in charge of wardrobe.  Although she’s closed the book here on earth, she’s by the side of those of us who knew her, in what she taught us about living.  About the benefit of making the right choice, not just the easy choice when it comes to giving something of yourself every day.  Nothing would make her happier than to look down and see all of us hugging our families, helping our neighbors and for heaven’s sake…finishing our pie.

God bless Grandma Beck,

Laura

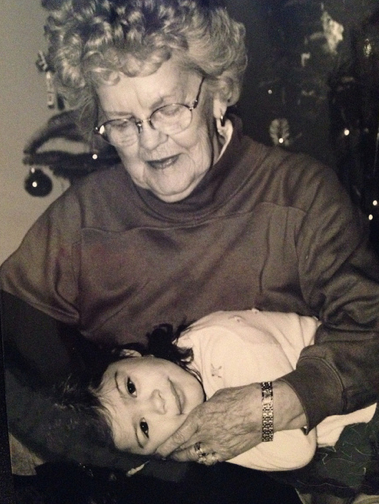
(With her great-granddaughter 13 years ago.)

Only Through Great Restraint

Restraint:  rɪˈstreɪnt


2 [uncountable]the act of controlling or limiting something because it is necessary or sensible to do so.

wage restraint

They said that they would fight without restraint (= completely freely) for what they wanted.


3 [uncountable]the quality of behaving calmly and with control


self-control  The police appealed to the crowd for restraint. He exercised considerable restraint in ignoring the insults.


In conclusion:

I saw this TV tray at a yard sale.  I didn’t buy it.  ‘Nuff said.


– Laura


p.s.  “A-Team” puffy stickers were available at the same sale.  I left those behind as well.  I deserve a flippin’ medal.


p.p.s.  My next few posts will be noticeably shorter due to the fact that I will be unable to type for a little while.  I’m sorry or you’re welcome, depending on how you feel about my blog.  😉


Time to quit my Jibba-Jabba!  Later, Fools!  

How to Make an Upscale Chia Pet Alternative in Five Easy Steps or: ONE MAN’S PAST IS ANOTHER GAL’S TREASURE

So you say you long for the nostalgia of ch-ch-ch-chia…but you want a unique and elegant alternative?  Well read on my sprout loving friend, read on!


If you have a pulse you have probably, at some time or another, either owned a Chia Pet, seen a Chia Pet, or at least seen the Chia Pet commercial.  They debuted in the late seventies and are still made today.


I recently found a treasure that got my mental gears spinning.  It all started when I saw the item pictured below:


There he sat, at an estate sale in Pacific Palisades, partially obstructed from my view by a table and a set of redwood patio furniture.  I was immediately drawn to this object, for what reason I cannot explain, but I really liked it.  After staring at it for a bit, I realized that the grooves in his “hair” were somewhat reminiscent of Chia Pets and I thought to myself:  “Hey!  I could grow sprouts on that crazy cool head!”  A deal was struck with the proprietress and I was the proud new owner of a well, er, whatever this is exactly.  Not quite a bust, certainly not a statue, but…something!


When I brought it home, my original plan involved Chia seeds.  I even went so far as to purchase some at my local Trader Joe’s.  If you live in a much warmer climate than I, or if you want to grow yours indoors, you could go this route.  As it turns out, Chia seeds need a steady temperature in at least the high seventies for optimal growth.  Night time temps here get fairly crisp, even when the weather is moderately warm during the day, so that was out for me.  I knew I wanted to display this item in the garden.


This was actually a bit of a blessing, because the more I imagined the finished product in my mind, the more I could see that I wanted something a little bit more subtle, a little more refined.  Not that I object to campy or even outright silly, but in this case, it just didn’t fit.  I didn’t want the objet d’garden art to look like a chlorophyll rich Phil Spector, for heaven’s sake!


I had some things left over from another gardening project and I wanted to use what I had on hand. I had some succulents, including a large flat of a fairly small and low-growing variety. After eyeballing them side by side I came to the conclusion that the succulent ground cover just wasn’t going to work.  I very loosely laid it on top just to be sure, but as you can see, it looked flat out redonkulous.


I’ve been a little obsessed with moss lately, so, after a hearty laugh, I went instead with a few different varieties of moss (all gathered from the yard) with a few tiny succulents thrown in for good measure.  Here’s how to make it all happen:


Step 1.  Buy a crazy random item for one dollar.  Mine is a head, but it could be ANYTHING!  You could use a garden gnome, an animal statue of some sort, or something simple such as an orb.  Spritz your item with water.


Step 2.  Apply a small amount of enriched soil on the moistened item.  Spritz liberally once more.


Step 3.  Apply moss in sections, pressing down firmly as you go along.  Spritz the back of each section with water before applying and wet thoroughly after each section is attached.


Helpful hint:  Shortly after beginning this project at an outdoor table, I realized that transport was going to be problematic until it was well established (a couple of weeks at least.)  Even though it was a bit awkward to finish everything with the head already on the ground, I set it into place and finished everything up there.


Helpful hint:  I used three different types of moss because I wanted a mottled surface.  I didn’t want it to look too uniform.  Whatever type you use is up to you.


Step 4.  Add a few random succulent pieces.  Base the size of your pieces on the size of the item you’re using.  Mine were quite small.  Succulents are very hardy and quite resilient.  I grow them often by simply breaking off a piece from one plant and shoving it into a pot or the ground…AND THEY ACTUALLY GROW!  No need to root them in water, just let ‘em go at it!


Step 5.  Mist until well soaked.  You’re done!


Some follow-up:

It is important to keep your item well watered for the first few weeks.  Once it takes firm hold you won’t need to be quite as vigilant.  Moss needs very little water and can tolerate more than you might imagine.

After I finished mine I decided the neck looked odd because the ground around it was so bare.  My garden is a work in progress…other than some trees nearly everything in the yard was dead, with no grass, etc.  Since I’m renting, I am keeping my budget as low as possible in the back yard.  So far I’ve found some plants at yard sales and done a few things, but because the ground is still empty overall, I just thought the head needed a little extra something.  Using some moss and unplanted succulents from another project, I filled in just a bit around the base.


Another alternative is to “paint” your item with a moss sludge (I actually went back and added just a bit after steps one through five, just for good measure.)  I wanted instant results, at least to some degree (it will still have to grow in and really fill in, this is just a start), so I didn’t use solely a moss sludge, but for details on how to go this route, check out the following link:


http://wp.me/p2YY9u-cU


Now that you’ve seen how to make it, I’d like to tell you a little more about the history behind it.

After completing the transaction, the woman running the sale and I chatted further, and details began to emerge that made my recent acquisition seem all the more precious.  What follows is the Reader’s Digest Condensed version of the story that she shared.


Her parents, both from the Ukraine, met in New York and fell in love.  Her mother, a free-spirited creative type, was an avid gardener and artist.  There were examples of her pottery throughout the sale.  The items she had amassed over her life were varied and interesting.  Some of them rough, some of them refined.  Most of them interesting.  The head was made by her mother and the model was her father.  Sweet story.


Now I am loving this item more and more.


Then she continues.  Her parents (separately, having not yet met) left the Ukraine during the Holocaust.  Her father’s story was compelling.  When he was a young man, he was rounded up and packed into a train car with over 100 other Ukrainians.  Everyone on the train was a stranger to him, with the exception of his lifelong best friend.  He and his fellow captives saw little avenue for escape.  The train was speeding along, far from any town, the doors were locked and the only ventilation on the train car was a TINY window at the very top of the wall, near the ceiling, far out of reach of all on board.  The general consensus was that all was lost.


Against the advice of his fellow prisoners he and his friend were determined to attempt an exit through this tiny window.  First his friend, and then he were boosted up by some of the others on board and managed to wriggle through the window.  He was knocked unconscious when he hit the ground for, he believed, over an hour.  His time estimate was based on the frequency with which trains passed through the area and the fact that the noise of an approaching train is what brought him back to consciousness.  Realizing that being spotted by a passing train meant likely death, he scurried away from the tracks and into a wooded area as quickly as he could manage.  He was unable to find his friend, because the train was going so fast that even going one after the other they were far apart.  He never saw his friend again.  He never knew if his friend survived the fall, if he did whether he was able to find his way out of the country or whether he might have been found during his attempted escape.


But the woman’s father did escape.  He left his home and came to the United States.  He met a crazy, quirky and beautiful woman.  He took her to southern California for their honeymoon and she refused to ever leave again.  Refused.  He went back to New York, packed their things and drove back across the country…WHILE SHE STAYED IN CALIFORNIA (this gal wasn’t kidding folks!)  With no job, no home, no clear plan.  He just leapt.  Again.  And when he told the story to his children, or to friends he told the story with laughter and love.  He cherished his quirky wife and her headstrong attitude.


He bought a home, raised his children and lived his version of the American dream.  Because he took a chance, because he flung himself from a speeding train, flung himself into an unknown country and flung himself willy-nilly into his life with his family.


I didn’t ask how he died (it was a true estate sale…both parents were gone) but we know how he DIDN’T die.  It is estimated that upwards of four million Ukrainians were killed in the holocaust.  This man wasn’t one of them.  In the face of one of the ugliest examples of what mankind can be capable, he survived.  And he didn’t become ugly simply because he had experienced ugliness.  He loved.  He lived.


They say that one person’s trash is another person’s treasure.


Well, in this case, one person’s past has become another person’s treasure.  It’s not just another purchase…it is something which will BE treasurED.  It’s a Chia Survivor!  A Chia Hero!


And just in case you are wondering if my repurposing this piece into garden art is disrespectful in some way, I told the woman at the sale (before she told me her parent’s story) what I had in mind and she was 100% on board.  After hearing the story I mentioned that now it seemed a little, well, frivolous.  She disagreed.  She thought her mother, especially, would have loved it.


I know that every time I look at “the head”, I will be reminded of the journey that lead it to my garden.


Fling yourself headfirst at life people!  You never know who you will touch along the way, or even after you’re gone.  Make all of those touches meaningful…touches for which you know you’ll be proud to be remembered!


-Laura  

GROW YOUR OWN MOSS FOR GRAFFITI AND MORE!

So, you say you want to propagate some moss on a rolling stone?  Well read on…


This simple recipe works for growing moss on rocks, planters, walls, garden statuary, pots and more.  Whether you’re in the mood to tag your house with some kick-a%& moss graffiti or are looking for a more traditional approach, the most cost effective way to get started is by making a moss sludge (milkshake/slurry.)


There are many, many resources online for propagating moss, this is the recipe that I have used.

You will need:

* Moss

* Yogurt

* Buttermilk

* An item you wanna “moss up reeeeal good.”

*Paint brush and/or spatula

*Rubber gloves (it’s up to you people…if you want to forgo the rubber gloves and live like animals, I’m not going to stop you.)

*Snacks…you always need snacks.

Step 1.  Gather moss and supplies.  You want a decent amount of moss.  Depending on the size of your project you can even fill the blender nearly full, let’s say ¾ of the way.  I used three different types of moss when I made this milkshake because I  was looking for a variegated pattern, but using more than one type of moss has the added benefit of giving the moss more chances to do well in your yard.  You never know which variety will take hold best, and this way you are throwing a wider net.  You can gather moss from your own yard (best if you have some, because you know it will grow there), get some from a friend or neighbor, order it online or even buy some at your local home improvement store or garden center.  I used two types from my yard and one type, left over from another project, which I purchased at Home Depot.


Step 2.  Place the moss in the blender and add about two or three cups of yogurt mixed with buttermilk

Helpful hint:  You may add a bit of sugar if you like, you may add a tiny bit of fertilizer and if you don’t have yogurt or buttermilk, you may substitute beer.  You may add beer to the yogurt and buttermilk concoction if you like (again:  wide net) but it’s not necessary.


Step 3. Blend on high until the mixture is VERY well blended.  Some moss enthusiasts prefer a thin mix, I prefer slightly thicker, as I have found that it is much easier to use.

Don’t stop yet…keep blendin’!


Nope, I know you are anxious, but it’s not done yet, keep going!


Helpful hint:  During the mixing and blending process, I kept a few spices on hand, such as tarragon, oregano or even run of the mill pepper.  Not because they are necessary for the recipe, but so that if my daughter wandered into the kitchen while I was in the middle of the project and asked what on earth I was making I could happily chirp:  “DINNER!” and watch the look on her face.  This step is optional, but quite honestly, the most entertaining.


NOW it’s finished!

Do your best to hold back.  I know this looks TOTES appetizing, but do NOT be tempted to lick your fingers or spread it on toast.  You’ll be disappointed.  Just ask my daughter.  If you’re feeling inclined to give it a try, this is a good time to fall back on the snacks you were supposed to include when you gathered your supplies.  I hope you didn’t get something lame like carrot sticks, because you’re going to be disappointed.


Step 4.  Skip your happy self outside and go to town with that nasty lookin’ stuff!  You can use a paint brush, spatula, or your hand (your rubber gloved hand!) to spread it onto walls, onto rocks, onto the ground, yard art, or, if you’re feeling particularly industrious, onto any exceptionally sedentary members of your household.  Baseball season and “Game of Thrones” marathons are two good options for when to attempt that particular project.


Helpful hints:  Most types of moss prefer shade, so try to choose a shaded location to grow your moss.  There are varieties that will tolerate some sun, but make sure that’s what you have if you want to try a sunny spot.  Also, be sure you’ve moved anything you will be removing eventually, such as leaves before you pour/spread it out on soil.


Follow up steps:  Keep an eye on the moss and keep it moist.  A fine misting is plenty once per day until it’s latched on well and seems to be thriving.  Keep in mind that this won’t happen overnight, so hang in there!


If you do “moss up” a loved one, be sure to keep them out of direct sunlight and take plenty of pictures.


Happy gardening!


-Laura

SNOW SHOE SPRUCE-UP or: How to Make a TARDIS Jacket in Five Easy Steps!


So you say your pre-loved item needs to be depersonalized or a less than ideal item needs to be customized?  Well keep on scrollin’, my friend…


Last winter, I needed boots for cold, yucky weather.  My wallet needed me not to need boots for cold, yucky weather.  Clearly, we were at an impasse.


I went to a moving sale.


Said moving sale had advertised “LOTS AND LOTS OF SIZE 6/6.5 SHOS AND BOOTS!”  (The author of the post left out the E, but I was pretty sure I knew what she meant.) Well, hot diggity dog!  Now you’re playin’ my song, yard sale ad posting lady!  I’m in!


I arrived just in time to see a woman walk away with what appeared to be every pair of shoes at the sale.  She had an oversized clothes basket filled with them.  MOUNDED!  OVERFLOWING!


Drat.


Oh well.  Next time.


But then what did I spy with my little eye?  These very waterproof Sorel boots, which appeared to have been worn only once or twice.  They were barely even scuffed on the soles!  Oooooh!  I was giddy with excitement!!!  I raised them aloft in my right hand, pointed to them with my left and was just about to ask the proprietress the price when I saw it.  Scrawled in ink (SHARPIE ink, no less) on the outside of BOTH shoes, the name of the former owner (her daughter I assumed.)


Drat.


Oh well.  Next time.


Hand came down, pointer finger assumed the at ease position.


“I know!” called the proprietress with a shrug.  “Nobody’s gonna buy those.”


I nod, sympathetically.


“If you’re buying that” (she points to the hardcover copy of Bill Bryson’s “At Home” that I have since picked up) “you can have the boots.”


Rrrr?


Yep.  I’m in.


I had no idea how I’m going to get Sharpie off of waterproof nylon, but I was going to try…and try I did!


To no avail.


It wouldn’t even budge!  I couldn’t even achieve success at a slight fading of the marks.


So what now, you ask?


Well here’s what I told myself:  They can’t get worse.  Even if I attempt something drastic and it’s a complete flop, no big deal…they were free and I don’t really want to wear them as is.  A grown woman with her name written on her boots would be sad enough.  A grown woman with SOMEONE ELSE’S name written on her shoes?  Now that’s too far.


Soooo….


Step One:  I grabbed a silver paint pen and a gold paint pen, left over from a project my daughter had done a few months ago and without preamble began drawing daisies on the boots.  I completely obscured the Sharpie scrawlin’s and it really didn’t look half bad!  It’s not fabulous, but it’s passable and the boots worked as a stop-gap measure until I found something better/cuter/less paint-penned.  🙂


Step Two:  There is no step two!  You’re done!  Relax and enjoy the rest of your day!  🙂


Let it snow!


Imagine what you could do with some forethought and a rainbow of paint pens!


This project would, of course, work on a variety of items, not just snow boots.  Keep scrolling for just one of the projects this one inspired my daughter and I to tackle!


After the success last winter with the snow shoes, I found a vintage Members Only jacket at a yard sale this past Saturday.  That, in and of itself, was a pretty righteous score, but the fact that it was blue got me to thinking.  What if my daughter Hadley and I made a TARDIS jacket?


For those of you out there who aren’t Doctor Who fans, I’ll explain.  The TARDIS is The Doctor’s spacey wacey, timey wimey machine.  It looks like a police call box.  If you’re not into Doctor Who, feel free to make a jacket for yourself with Mork & Mindy, The Cat from Outer Space, Alf, or any other alien, however inferior they may be to The Doctor.  Nobody is judging you.  Ok, yeah, we’re judging you.  ALF?  Really?


Here are the easy steps and some pointers for customizing a jacket of your own (no sonic screwdriver necessary):


Step 1.  Gather your supplies:


Get a jacket:  I suggest something in a fabric such as waterproof nylon, Gortex or with manmade fibers.  (The paint is less likely to bleed.)


I am of the opinion that if one is attempting a project for the first time, it’s advisable to start with something in which you have very little invested.  I spent only one dollar on this jacket.  Maybe you have one laying around that you don’t wear anymore, that has a stain or you could pick one up at a yard sale or a thrift store.  (This way you’re less likely to bleed money.)


Get a pencil, an eraser and some paint pens:  We used DecoColor paint pens.  It is important to use permanent (oil based) pens for a project like this and NOT water based…otherwise the colors will run if they are exposed to any water.  It also makes clean up trickier (see below) but there’s no way around that if you ever want to launder your item, spot clean it, or if you live in Seattle.


We found ours at Michael’s Crafts and used the weekly 40% off coupon (available in their flier, online, or via the Michael’s smart phone app.)  These paint markers are available on their website:


http://www.michaels.com/Uchida-DecoFabric-Marker—Basics/gc1666,default,pd.html?cgid=products&start=25


Get snacks:  We made poor choices.  We went with Trolli PeachieO’s.  PeachieO’s are available at Michael’s Craft stores, your local Gas n’ Sip, or anywhere snack time dreams are dashed.


Now that you have your supplies it’s time to get with it!


Step 2.  Look online for a picture of the TARDIS to use as a blueprint of sorts.  This is the picture Hadley found:


We used this picture in an effort to keep things really simple.  We weren’t going for over the top fabulous, just easy and straightforward, because it was the first attempt.


Step 3.  Sketch out what you want to paint in pencil before you make it permanent.  Picasso’s first word as a baby was “piz” (short for lapiz…the Spanish word for pencil) so, yeah, don’t get too cocky here.  If it was good enough for Picasso, it’s good enough for you and me.  If you’re going for something with a lot of straight lines, winging it might not be your best option in this case.


Helpful hint:  Before you start drawing and especially before you start painting, put a piece of foam core (always my first choice if I have it on hand), cardboard, or at least some paper bags or plastic between the layers of the garment and also between the garment and the surface on which you’ll be working.  This obviously protects your furniture, but placing a layer between the front and back of the jacket gives you something of substance on which to press your pencils/pens.  It also protects the front of the jacket from paint that might soak through.


Step 4.  At this point start going over what you did in pencil with paint pens.  In our case, Hadley drew the white outline, I filled in the blue and then touched up the white.  This version is VERY simple, but you could get much more intricate if you have the time and are so inclined.  In our case we are starting the project mere hours before my blog is scheduled to “hit the presses”, so intricate was off the table.  We’ll be adding more to the jacket later, so check back for updated photos.  🙂


Helpful hint:  In our haste some of the paint was smeared.  We tried fingernail polish remover to take out the smears with no luck, but Oops! took it RIGHT off, leaving zero spot or residue behind.  Oops! is pretty great stuff to keep on hand.  It is available at Sherwin-Williams.  I sometimes have trouble finding it, and since one can lasts almost as long as two presidential administrations, by the time I need another can the store where I bought it last has normally stopped carrying it, has gone out of business, or has been replaced by a Starbucks.  Starbucks doesn’t carry Oops!


Corporate bastards.


You might want to take a break at this point.  Wait a few minutes while the paint dries before moving on.  You MIGHT consider Trolli PeachieO’s.  I advise against it.


Step 5:  Go back, fill in, touch up, wear and enjoy!  Allons-y y’all!


Again, check back for a more finished product.  I broke my finger and projects/typing have been a challenge…but there will be more to come soon!


Nanu-Nanu,


Laura


THE PURSE PARADOX or: HOW TO MAKEOVER AN OLD PURSE IN SEVEN EASY STEPS!

So you say you don’t believe me when I say that an unusable purse has value? Well grab a paintbrush, and PTL for second chances.

Not too awfully long ago, I saw a purse.  Okay, okay…maybe some time has passed.  Alright, you know what?  FINE!  Last year.  It was last year.  I’m just now getting around to writing about it.  It was a sweet little winter white, satin Coach purse at a yard sale for five dollars.  Only problem?  It had stains.  At first glance they weren’t apparent, but upon closer inspection it could easily be described as dingy and certainly wouldn’t be an accessory one would be itching to dangle off of one’s arm (it made me itchy just to look at it.)  It was, for all intents and purposes, a lost cause.  I almost passed it up.  Left it behind and never looked back.  “I am far more deserving than a STAINED purse!”, I told myself.  “Clearly the previous carrier of this purse did not treat it carefully, in fact, it almost looks as if they didn’t even care about it at all!”  Logic and reason dictated that this particular little purse was not worth my time.  “Why do you always talk to yourself?” I asked.  “Because I fascinate myself!” I answered.  “And because nobody else is here.” I mumbled.


I began my return trip down the driveway from the garage to my car.  I could find far better purses another day!  That’s right!  Forget you, Coach purse!  Then it was almost as if that little purse called out to me:  “Hey!  Hey!  Don’t give up on me!  There’s more here than you might think!  I am worth your time!  I AM!


Giving in, back up the driveway I trudged, mumbling to myself once more, this time over being a sucker, questioning my sanity based on that fact that I was listening to an inanimate object and completely unrelated, wondering if there were any sour gummies left in the console of my car.


So, I bought the purse, took it home and in my office it sat for a day or two….or three, or a week or three, or yeah, as we’ve established, maybe a few months.  I eyed it on and off, wondering if I had made a mistake.  In the retelling I imagine myself giving it a stare down a’la Clint Eastwood, you know, because I’m a stone-cold bad@#%.  In reality it was more like a few sidelong glances that accompanied some cranial wiggling on how to clean it, alternating with second guessing myself regarding the purchase.  More than once I almost chucked it.


Let it be known that I am the stain eradicator!  If you have a question about laundry, I’m your gal.  One of my superpowers is stain removal.  I’m not sure exactly what the costume would be for a superhero with this power…but I haven’t ruled out the possibility of wearing one (one that I would, of course, hand wash and line dry.)  This purse, however, presented problems.  It was resistant to coming clean.  It was like it didn’t want to clean up nicely!  I couldn’t just attack the stains (and I had experience with this) or the fabric would bubble and buckle (satin fabric with backing…stain removal Kryptonite!)  I tried a few of my favorite remedies in inconspicuous places.  No dice.  The staredown recommenced.  I’m pretty sure the stains laughed evil laughs.  They had plans.  Dark plans.  Bad plans. Wicked plans!  Unfortunately for them, they picked the wrong stain-fighting superhero.


After a few days it hit me.  This purse wasn’t ever going to be exactly what it had been when it started its life unmarred, pristine, and fresh…but maybe if I changed MY preconceived notion about what it had to be, it could be even better.


There were a lot of ways one could amend an item such as this, and we’ll cover other options in future posts, but for now, let’s talk about the painting process.  It’s not as apparent in the photos, but there were quite a few stains and also just an overall dinginess to the purse.  It had lost its former beauty. It was grimy.  It was lifeless.  Here is how it started its life with me (it actually doesn’t look too bad in the photo…but in person it was a bit of a mess):

I set about the process of painting the purse (that’s right…PAINTING it!)


Follow me:


Step 1:  Obtain or retain imperfect item.  Contemplate possibilities.  Consider chucking said item.  Forget to put it out on trash day.  Shrug.  Continue contemplating. What to do?  What to do?

Step 2:  Settle on painting purse with transparent fabric paint.  The results are much like dye, but the application, for an item such as this are less problematic.  The paint I used was left over from a similar project I had done a while back.  I am typically not a hanger-oner of stuff in general, but I loved this product (which was not inexpensive, over ten dollars per bottle at the time) the bottles were still nearly full and I loved the results of the previous project, so I had kept it on hand ever since.  I might have used different colors, had I been buying the paint specifically for this idea, but unsure as to whether the purse would survive the painting process I was unwilling to invest in new colors.  Now that I know that it works, I would.  The reason this paint works, as opposed to traditional fabric dye is that it is QUITE thick and does not need additional water.  Water is what warps and bubbles fabric purses like this.  While there was, of course, some moisture in the product, I was able to keep it to a minimum by applying it sparingly.  I wrapped the handle and zipper pull in Saran Wrap to protect the leather just in case either happened to touch the paint before it was dry.


Here is a link to the fabric paint I used:


http://www.dickblick.com/products/pebeo-setacolor-fabric-paint/


(That link looks vaguely racy.  Heh.  But it’s not.  Really.  Click with confidence in the fact that it is rated G.)

Step 3: Plow ahead.  I started painting, using pink in some places and purple in others.  Using two colors gives it a more easy going/slightly bohemian look, a little more depth and allows room for error, but one could do a solid color as well.  I began by painting the areas I deemed riskiest, such as along the edge of the zipper, where the handle met the sides of the bag and around the leather Coach logo tag on the front.  I used a small, thin, slanted brush.  If you don’t have one in your arsenal of paintbrushes, a flat, slanted eyebrow/eyeliner brush works really well.  The paint I used is water based and washed out of the brushes completely with some soap and water.

Step 4: Look at the mid-project hot mess and second guess yourself again, but then choose to soldier on.  I continued painting, moving to a much larger flat brush.  I painted each quadrant in eighths, switching up and alternating between the pink and purple.  It is important to overlap the colors a little, but not too much.  You can also paint the entire thing in pink and then go back with the purple, but this only works if your colors are similar, as the ones used here.  Another way to go would be to use colors such as yellow and blue, and where they overlap you’ll get green.  Just be sure to test the result beforehand.


Step 5: This next step is optional.  While the paint was still wet I sprinkled coarse sea salt on the purse.  The effect can be as subtle or dramatic as you’d like.  Add it quickly after painting and leave it on for a long time and you’ll get much more intensely mottled effect.  The effect is achieved as the salt absorbs the paint on and around the spot where each granule lands.  As each piece of salt is of a varying size, it gives an imperfect, hand done look.  I put mine on after only a few minutes of dry time and left it on for less than 30 minutes.


Step 6:  While the salt is doing its job, stop, rest, have a cup of tea and ruminate on the parallels between purses and life.

Sometimes this happens in our relationships.  Maybe you and your boss are often butting heads.  Maybe your once adoring child became an angst ridden teenager awash in hormones and seemingly hell bent on convincing you that you’re the antichrist…or at least the anti-cool.  Maybe a relationship with someone you love hit one too many speedbumps and you could never see that person as you once did.  Look again.  Maybe your boss will be a little easier to handle if you realize she might have struggles in her life about which you are unaware.  Maybe your teenager doesn’t enjoy his misery any more than you do.  (Let’s face it, being a teenager can suck.)  Maybe your friend or loved one is ready and willing to replace the speedbumps with wide open highway…but they need for you to climb in the passenger seat and be a willing navigator.  A little compassion goes a long way and a willingness to see beyond what’s broken and have faith in what’s worth saving might be all that’s needed.  No one purse and no one person is perfect.  Perhaps none of these relationships will be pristine white, shiny and new ever again…but if they have good bones and they’re meant to stand the test of time they will.  That is, if, rather than expecting to erase the stains you choose to put them behind you.  If you allow it.  If you get creative.  If you let go of what was and imagine what can be…and then follow it up with action.  Be an active participant in the rejuvenation project.  Expecting dramatic change from anyone with whom you interact without also putting some time in yourself is an expectation doomed for disappointment. Now, of course, you could keep going out and getting a new pristine “white purse” (spoiler alert…we’re not talking about purses anymore, people) every year…but no matter how careful you are, every white purse is going to become stained at some point.  It may have been mistreated by previous owners, it may have hidden its blemishes behind designer logos, or maybe you just tossed it carelessly in the back of your closet and forgot about it.  Remember that to someone we ALL were once a pristine white purse that became a little dingy.  Don’t you want a second chance at life?  Don’t you want a chance to be colorful; a chance to be seen as worthwhile as you really are?


So, rather than throwing out your current purse and buying a new one every six months, maybe colorful, beautiful and built to last is better anyway.  I can tell you that I think it is (scroll down for a photo.)


Grab a paintbrush friends!


<3!


Laura


p.s.


Step 7:  Step back and admire your work. It might not be right for just anyone, but I think it’s perfect!  (FYI:  It is less vivid and a bit more subtle in person…I have yet to master iPhone photos.)


THE BETTER WAY TO STORE YOUR BLING!

So you say your jewelry needs a home?  Read on my well accessorized friend, read on.


This week’s project is quick and easy, anyone can do it, and (hint!hint! fellas) it’s a great surprise project that will make your significant other giddy with joy!  Imagine the look on your loved one’s face when they come home to find what you’ve made for them!

Do you have too much bling for a small jewelry box, but want something a little more unique than those mass produced jewelry cabinets?  By using a piece of furniture you already own, or finding an inexpensive one second-hand, you can have something much better, for much less!


Over the years I have accumulated jewelry.  Most of it from yard sales. I thin the crop from time to time, but I find that with jewelry, you just never know when you’re going to need that one quirky necklace, that classic cuff bracelet or those Ren and Stimpy shrinky dink earrings (IT COULD HAPPEN!  I MIGHT WEAR THEM AGAIN!)   As I have an affinity for vintage jewelry (and have a more difficult time discarding the vintage pieces) my collection needs a home.


We’ve all had experience with attempting to make jewelry storage work in a small box or drawer.  It doesn’t.  But does this mean we’re doomed to a lifetime of untangling necklaces which have seemingly fused together in one giant mass, or searching in futility for the mate to your favorite earring?


Fear not!  All of your jewelry storage issues can be solved in an afternoon!


Here is a step by step on how to make it happen:

Step 1.  Measure the inside of the cabinet, drawer or drawers you plan to convert.  


Step 2.  Cut foam core  (it’s a bit like poster board, only thicker.  It has a layer of, you guessed it, foam, in between the layers of thick paper) to the size of the drawer.  The size should be pretty darn close to the size of the drawer.  You can go a SMIDGE smaller to allow room for the fabric and batting, but I kept mine within ¼ of an inch.


Step 3.  Lay foam core on top of batting.  Cut batting about 1 ½” wider on all four sides than the piece of foam core.


Sidenote:  In case you’re wondering no, step 2b. was not “have a glass of wine or three”…my pictures just didn’t turn out so well.  Apologies for the blurry ones above and below!  :/


Step 3.  Do the same with the stretch velvet, cutting the velvet just a little wider than the batting.


Side note:  The back of these pieces are not visible at all once they are installed, so I didn’t even try to do a neat job when I was cutting the batting.  My scissors were old and dull and it all looks like a hot mess…, but don’t fret, it doesn’t matter one whit once it’s all in place.


Step 4.  Begin taping first the batting and then the velvet to the back of the foam core.  I have tried this with other projects and duct tape works best, as long as one is not worried about the back of the project looking “clean.”  I have used glue, staples and other forms of tape.  None were as effective.  If it matters to you how the backside of the foam core looks, you can cover it with black felt after you finish.  Start with one good sized piece on the center of each side.  It doesn’t stay in place super easily at first.  It’s more manageable if you enlist the help of a willing friend, or an unwilling teenager who would rather be watching John Green videos on youtube.  Your helping hand can then hold the fabric in place while you tape, or vice-versa.


It is important to pull the batting and fabric taut, but not too taut, or it makes it even more difficult for the tape to hold both in place.  It’s not an exact science.  You’ll figure it out as you go along.  🙂

Step 5.  Continue taping the batting as if duct tape grows on trees, next, tape the fabric as well, until it is completely covered.  Then put several additional layers of tape over what you’ve already done, in order to secure it in place.  On the corners, pull it towards the center, forming a pleat and tape like crazy.  Watch as it slips out of place.  Swear.  Tape again.  Invent new swear words.  Tape yet again.  When you have effectively depleted the duct tape rainforest to such a degree that Pete Seeger is knocking around some ideas for a song about you, add one more layer, and then rest.


Once you’re ready to “hammer out” the remainder of the project, move on to the next step:


Step 6.  Place in drawer.  If you did it just right it should be just a little tight.  That way it won’t slide around inside the drawer.  My pictures aren’t too great…it looks as if the fabric is wrinkled, but I’m not sure why…I think the flash picking up the nap of the fabric.  The stretch velvet actually stayed wrinkle free.


Step 7.  For the left hand side of my cabinet, which was an open space rather than drawers, I added LED tap lighting.  It would have been fine without, but it was a little dark, and not only that, but the lights made things sparkle and look pretty.  These amounted to a decent portion of my budget for this project, around seven dollars at Target for two, but in the end, I think it was worth it.  They install easily with double sided foam tape (included.)


Next I added hooks to the inside of the cabinet doors and to the inside of the open cabinet compartment.  Because this was a reasonably decent piece of furniture, I used Contact brand adhesive hooks, which won’t damage surfaces.  I had an old pine armoire years ago that I used for a similar purpose and used chrome screw in cup hooks.  I actually prefer the look of the cup hooks AND they hold larger items more comfortably.  Whenever I attempt a project such as this one I always try to allow room to grow.  In this instance I added more hooks than I need right now.


For the interior of the cabinet, in addition to hooks and the tap light, I added another black velvet liner for the “floor”, a black velvet jewelry display for necklaces and bracelets, and I also used some decorative dishes for storing extra bracelets.  I found my velvet jewelry display stand at a yard sale for a dollar, but they’re not priced out of reach even at full retail.  They are available in a few different styles and sizes at JoAnn Fabric and Craft stores for between 2.99 and 29.99, are frequently on sale and JoAnn also offers a weekly 40% off coupon for one item.


Here is a link to the JoAnn website showing the display stands:


http://www.joann.com/search/_velvet%20jewelry%20stand/


Here is a link to their coupon page.  There is almost ALWAYS a 40% off coupon.  I used mine for my fabric:


http://www.offers.com/joann/?path=bpa-r2zo-gls-100a1a&ablpid=2344&kw_id=582-417989&k_click_id=1ffda10f-2467-7a69-0372-00004c54e048


You can also get the JoAnn app for your smartphone.  This way you always have the coupon on hand and don’t need the weekly flier.

I tried to keep like items together, pins, earrings, rings, etc.


The wider, lower top drawer was perfect for extra long or heavy necklaces and I also used it to store jewelry cleaning supplies.


All in all, I was pleased with the outcome!


I ended up with two extra drawers, and lined those with velvet inserts as well, because I had enough left over materials.  The extra drawers could be used for sweaters, delicates, etc.  Either way, it’s bonus storage!  🙂


I spent just over 30 dollars for all of my supplies and it was worth every penny!


So, there you have it…your own custom jewelry case is just a trip to the Salvation Army and the fabric store away!

I’ll leave you with this:


“The only thing that separates us from the animals is our ability to accessorize” – Clairee Belcher (“Steel Magnolias”)

– Laura


DID BRIAN WILLIAMS READ MY BLOG? ;P

Just a few days after my snarky commentary on the price point strategy employed by Goodwill Industries, I received a text from my mother, alerting me to the fact that Brian Williams’ show “Rock Center” was airing an expose regarding the wages paid to Goodwill workers.

Due to a loophole in the minimum wage laws, Goodwill is able to pay handicapped workers as little as 22 CENTS per hour (this means that the sale of two pairs of DONATED jeans would pay for an entire WEEK of work for one of these workers!), while Goodwill executives make  salaries such as 440,000 per year, up to 1.1 million dollars per year.  To make matters worse, Goodwill’s CEO went on record in an interview defending the practice.  I am more than outraged, I am disturbed and disgusted.

Goodwill turned a PROFIT of OVER $5,000,000,000.00…that’s right…Five BILLION dollars!!!!

Yet they can’t see fit to pay their workers even minimum wage?  For shame.

Workers at Apple’s Chinese “sweatshop” factory make $1.73 per hour.  What does this say about an organization which purports to help the disadvantaged?

Image

Your Goodwill donations:  Helping to exploit the handicapped since 1902.

Here’s a quote from Goodwill Industries:

“As a unique hybrid called a social enterprise, we defy traditional distinctions. Instead of a single bottom line of profit, we hold ourselves accountable to a triple bottom line of people, planet, and performance.”

I have one non-word for you Goodwill:  Pfffft!

Here’s the thing.  I’m a gal who believes in the capitalist system.  Supply and demand, work hard, make the best of what you have, etc.  But THIS?  No.  Just because it’s legal, doesn’t make it right.

“Goodwill” my a@#.

http://www.nbcnews.com/video/rock-center/52257275#52257275

Viva la revolucion,

Laura

p.s.  Write a letter, send an email, make a phone call, stage a protest or at LEAST share this post or send the link to anyone you know who shops at Goodwill.

p.p.s.  Please excuse me while I now step down from my soapbox.  Jokes and general snarkiness to resume on my next post.  :p


EYE-“POPPIN’ TAG” PRICES

So you say you’re in the mood for a cup of joe?  Well, don’t start that journey at Goodwill, my arabica bean loving friend.


Take a look at the photo.  Go ahead.  Do you see it?  Are you chuckling?  No?  Ok, look again.  I’ll wait.


(*whistles, taps toe, looks around.)


You’re back!  NOW do you get it?  I thought so.


*cue “The Circle of Life”


The above photographed mug, which began its journey at The Salvation Army has found its way to Goodwill and they’re selling it for 1.99.


Now, let me be clear.  I enjoy thrift stores.  More than just a little.  Kind of a lot.  Enough that I’m writing about them.  That said, their pricing practices can sometimes confound and confuse me.


I snapped the above photo at a Goodwill in Tucson, Arizona.  What you see is about 1/6th of the number of mugs they had for sale.  The lowest priced mug was 1.99, most seemed to be 2.99 and they went up from there, and there wasn’t a complete matched set in the ragamuffin bunch.  It was like a Dickensian orphanage for mugs.


This got me to thinking about my penchant for buying nearly exclusively secondhand.  Is that always the most economical choice?  The answer is no.  Not always, and especially not if one is shopping at Goodwill.


Here are a few examples of the retail prices for mugs I found with a quick google search:


How about a perfectly lovely mug from Crate & Barrel?  Granted, it won’t have any personalized chips on the handle, pre-applied Sanka rings on the interior, or the remains of an unknown user’s Fashion Two Twenty Party Pink lipstick on the rim, but at four cents LESS than the average price for a USED mug at the above Goodwill, you can’t deny that it’s a steal!


Is a customized mug more to your liking?  You can have one with your company logo, a photo of your grandchildren or “My Tardis Brakes for Yard Sales” emblazoned on the front for a mere $4.43 (or 1.08 if you have need for 5,000+ of them.)  Now, this might be slightly more than the $2.99 you’ll pay at Goodwill, but let’s not forget that they use LEAD FREE inks!  That’s gotta be worth just under an extra buck fiddy.


Last but not least, let’s consider the fact that you might want something really special, simply have expensive taste or maybe you throw money around like Lil’ Wayne at a strip club.  You can make it rain at the Bloomingdale’s website…that’s right, BLOOMINGDALE’S.   There you can procure a unique and interesting mug for less than thirty dollars.


Now I put the question to you:  Is the Goodwill mug a bargain?  I would argue that it is not.


The point I’m making is that what appears to be a bargain on the surface, may not really be.  Do your research, pay attention and know what matters to you.  Thrift stores and yard sales are a wonderful resource for creating a beautiful home on a budget, but they’re not the only resource.


While the average American paycheck remains stagnant, or for many has become nonexistent, and the prices on many consumer goods and services continue their seemingly endless downturn (gasoline, milk and pro athlete salaries notwithstanding) the prices at many national chain thrift stores (based on my colloquial observations) have enjoyed a steady spike.  So, what gives?  As far as I can tell, there is only one explanation:  The folks pricing the goodies at Goodwill are on crack.  All of them.  On crack.  Crack cocaine.  However it is that one ingests crack, they’re doin’ it.  They must be doing SO much crack that they’ve lost their foothold on reality.  Just sitting in the back, doin’ crack, and pricing stuff.  Perhaps they REALIZE the prices are outlandish, but they need the money in order to support their dozen cracks a day, Costco-sized portions habit, I don’t know.  I am not an expert on crack.  All I know is that crack has GOT to be a factor.  Right?  Yeah, sure, right.


My mother shops at Macy’s.  She has a Macy’s card.  She has frequently regaled me with  stories of the bargains she has found, such as a perfectly lovely designer top for FOUR DOLLARS and seventy cents (on clearance with Macy’s coupon.)  Now, contrast that with the fact that if I walk into my local area Goodwill and saunter down the long sleeved shirt aisle I can find any number of stained, pilly, out of style Mossimo tops.  The cost?   FIVE DOLLARS and seventy nine cents.  What?  WHAT?  Yeah.  Seriously.


So, assuming that my crack theory is off target, what on earth could lead the powers that be at Goodwill to these ludicrous price point decisions?  Greed?  A complete lack of knowledge of retail trends?  An utter inability to give a s*%@?


Inquiring minds want to know.


In order to prove my point (because, hey, what girl doesn’t want her point proven?) I stopped in a local Goodwill location recently and snapped some photos.  It was NOT difficult to find these examples of rampant crack-headery.  I was in the store for maybe five minutes.  I didn’t even scratch the surface of the UNdeals to be had.  Check it out and get your outrage on:


Exhibit A:  Six-year-old iPod docking station. Missing buttons.  MELTED.  8.99  EIGHT DOLLARS AND NINETY-NINE CENTS!!!  I found a brand new iHome docking station online at Office Depot for 21.99.


I could rest my case here, but let’s move forward, shall we?


Exhibit B:  Canon Electronic calculator.  Let the record show that said calculator has missing parts, is paint bespeckled, clearly began its life during the Carter administration, is no longer in possession of its red nor its black ribbon and has no power cord. 12.99.


I found a brand new Canon Electronic calculator online with more features for 18 dollars.


Exhibit C:  Older model George Foreman Lean Mean Fat Reducing Grilling Machine!  Missing parts.  Greasy interior.  17.99.  Yep!  17.99.  Your honor, I object…to this pricing strategy!


I am pretty sure that the number of George Foreman grills on the secondhand market outnumbers the total number of men, women and children living in the lower forty eight states.  I haven’t run the actual numbers, or conducted a poll or done “research” per se, but I stand by my calculations.  I have never purchased a George Foreman Lean Mean Fat Reducing Grilling Machine!, yet I am confident that if I went into my kitchen right now and checked the dark recesses of my cabinets, I would find that one had magically appeared.  Maybe they’re mating when we’re not looking.  Maybe they are an alien lifeform sent here to study our curious ways (and reduce our fat intake.)  Maybe Americans buy a lot of stuff we don’t need….nah!  It’s probably the alien thing.


At any rate, what I’m saying is that there is a glut of George Foreman Lean Mean Fat Reducing Grilling Machines! out there.  If what we learned in high school economics holds true and value can typically be determined by the number of items available vs. desire/consumption of said items (supply and demand) then I am going to go out on a limb and say that this teflon coated item is overpriced.


Here is an example of one that actually sold on eBay recently, keeping in mind that almost ALL of the George Foreman Lean Mean Fat Reducing Grilling Machines! (Whew!  The person who named the George Foreman Lean Mean Fat Reducing Grilling Machine! could never be accused of being overly concise…I am burning fat just typing the name!) of this vintage remained unsold:


99 cents.  Even factoring in shipping, this lucky (sure, let’s say lucky?) buyer saved themselves nearly half off of the Goodwill price…and it was offered complete, in good condition and with all of its parts and accessories.


Exhibit D:  VERY broken Rowenta Iron.  12.99.  Sigh.  Ladies and gentlemen of the jury, you will hear testimony that this iron did aid and abet Goodwill in their attempt to willfully and wantonly murder the bank accounts of their customers.


Now, granted, this Rowenta comes with complimentary greasy mystery stains (perhaps it was gettin’ cozy after store hours with the GEORGE FOREMAN LEAN MEAN FAT REDUCING GRILLING MACHINE!  As we’ve already surmised the George Foreman Lean Mean Fat Reducing Grilling Machine! IS all about reproducing, after all)  but I did find a Rowenta iron online at Lowe’s for 31.99.  Lowe’s typically sells its irons WITH the handles attached, so, you know, there’s that to consider.


Madam Foreman (lean mean fat reducing grilli…oops, sorry, it’s force of habit at this point), what say you?


“We find the defendant.  Goodwill Industries GUILTY on all charges!”


Now, all of this said, I must admit that I do still find bargains at Goodwill, but they are becoming fewer and further between.  There are a few locations I no longer bother to frequent, their pricing has become so outlandish.  The prices seem appropriate for about 3% of the merchandise.  The rest is better left behind.  So what has happened?  Thrift stores that are SO packed to the gills, one can barely flip through the racks without sustaining Carpal Tunnel Syndrome, make heads or tails of the precariously stacked dishware, or sort one’s way through the cracked tchotchkes without setting off an avalanche of dust and Home Interiors figurines, that’s what.  What happens then?  Damaged merchandise.  Is it just me, or is this pricing strategy counterproductive to Goodwill’s mission?  These prices are certainly not helping those in need to buy clothes or other necessary goods for their families and I have seen the racks and shelves SWELL with product as the prices continue to rise, which tells me people are buying fewer items.  Would not a more reasonable price move more product and help more people?  The cost behind running the thrift store (rent/utilities/staff/insurance/etc.) does not escape me, nor does the fact that the proceeds benefit other good causes, but I can’t help but think that all would be better served by lowering the prices and selling much, much more.


Throw down that pair of high-waisted acid washed jeans, the VHS copy of “Short Circuit II”  and the painfully ugly 1980’s sweater (they’re not ironic anymore anyway, they’re just ugly), America!  Stand on a nearby rickety table and go Norma Rae on their behinds!  Call your regional area Goodwill representative and tell them to stop doin’ crack, get in a twelve step program and get to gettin’ at making amends!


LOWER PRICES NOW!  LOWER PRICES NOW!  LOWER PRICES NOW!


p.s.  My apologies to any of my readers who do crack.  I’m sorry to have associated you with the folks pricing the merchandise at Goodwill.


Godspeed fellow bargain hunters,


Laura


Blog at WordPress.com.

Up ↑