Search

The Home That Yard Sales Built

How to conquer life's obstacles one bargain at a time!

Tag

Salvation Army

Only Through Great Restraint

Restraint:  rɪˈstreɪnt


2 [uncountable]the act of controlling or limiting something because it is necessary or sensible to do so.

wage restraint

They said that they would fight without restraint (= completely freely) for what they wanted.


3 [uncountable]the quality of behaving calmly and with control


self-control  The police appealed to the crowd for restraint. He exercised considerable restraint in ignoring the insults.


In conclusion:

I saw this TV tray at a yard sale.  I didn’t buy it.  ‘Nuff said.


– Laura


p.s.  “A-Team” puffy stickers were available at the same sale.  I left those behind as well.  I deserve a flippin’ medal.


p.p.s.  My next few posts will be noticeably shorter due to the fact that I will be unable to type for a little while.  I’m sorry or you’re welcome, depending on how you feel about my blog.  😉


Time to quit my Jibba-Jabba!  Later, Fools!  

How to Make an Upscale Chia Pet Alternative in Five Easy Steps or: ONE MAN’S PAST IS ANOTHER GAL’S TREASURE

So you say you long for the nostalgia of ch-ch-ch-chia…but you want a unique and elegant alternative?  Well read on my sprout loving friend, read on!


If you have a pulse you have probably, at some time or another, either owned a Chia Pet, seen a Chia Pet, or at least seen the Chia Pet commercial.  They debuted in the late seventies and are still made today.


I recently found a treasure that got my mental gears spinning.  It all started when I saw the item pictured below:


There he sat, at an estate sale in Pacific Palisades, partially obstructed from my view by a table and a set of redwood patio furniture.  I was immediately drawn to this object, for what reason I cannot explain, but I really liked it.  After staring at it for a bit, I realized that the grooves in his “hair” were somewhat reminiscent of Chia Pets and I thought to myself:  “Hey!  I could grow sprouts on that crazy cool head!”  A deal was struck with the proprietress and I was the proud new owner of a well, er, whatever this is exactly.  Not quite a bust, certainly not a statue, but…something!


When I brought it home, my original plan involved Chia seeds.  I even went so far as to purchase some at my local Trader Joe’s.  If you live in a much warmer climate than I, or if you want to grow yours indoors, you could go this route.  As it turns out, Chia seeds need a steady temperature in at least the high seventies for optimal growth.  Night time temps here get fairly crisp, even when the weather is moderately warm during the day, so that was out for me.  I knew I wanted to display this item in the garden.


This was actually a bit of a blessing, because the more I imagined the finished product in my mind, the more I could see that I wanted something a little bit more subtle, a little more refined.  Not that I object to campy or even outright silly, but in this case, it just didn’t fit.  I didn’t want the objet d’garden art to look like a chlorophyll rich Phil Spector, for heaven’s sake!


I had some things left over from another gardening project and I wanted to use what I had on hand. I had some succulents, including a large flat of a fairly small and low-growing variety. After eyeballing them side by side I came to the conclusion that the succulent ground cover just wasn’t going to work.  I very loosely laid it on top just to be sure, but as you can see, it looked flat out redonkulous.


I’ve been a little obsessed with moss lately, so, after a hearty laugh, I went instead with a few different varieties of moss (all gathered from the yard) with a few tiny succulents thrown in for good measure.  Here’s how to make it all happen:


Step 1.  Buy a crazy random item for one dollar.  Mine is a head, but it could be ANYTHING!  You could use a garden gnome, an animal statue of some sort, or something simple such as an orb.  Spritz your item with water.


Step 2.  Apply a small amount of enriched soil on the moistened item.  Spritz liberally once more.


Step 3.  Apply moss in sections, pressing down firmly as you go along.  Spritz the back of each section with water before applying and wet thoroughly after each section is attached.


Helpful hint:  Shortly after beginning this project at an outdoor table, I realized that transport was going to be problematic until it was well established (a couple of weeks at least.)  Even though it was a bit awkward to finish everything with the head already on the ground, I set it into place and finished everything up there.


Helpful hint:  I used three different types of moss because I wanted a mottled surface.  I didn’t want it to look too uniform.  Whatever type you use is up to you.


Step 4.  Add a few random succulent pieces.  Base the size of your pieces on the size of the item you’re using.  Mine were quite small.  Succulents are very hardy and quite resilient.  I grow them often by simply breaking off a piece from one plant and shoving it into a pot or the ground…AND THEY ACTUALLY GROW!  No need to root them in water, just let ‘em go at it!


Step 5.  Mist until well soaked.  You’re done!


Some follow-up:

It is important to keep your item well watered for the first few weeks.  Once it takes firm hold you won’t need to be quite as vigilant.  Moss needs very little water and can tolerate more than you might imagine.

After I finished mine I decided the neck looked odd because the ground around it was so bare.  My garden is a work in progress…other than some trees nearly everything in the yard was dead, with no grass, etc.  Since I’m renting, I am keeping my budget as low as possible in the back yard.  So far I’ve found some plants at yard sales and done a few things, but because the ground is still empty overall, I just thought the head needed a little extra something.  Using some moss and unplanted succulents from another project, I filled in just a bit around the base.


Another alternative is to “paint” your item with a moss sludge (I actually went back and added just a bit after steps one through five, just for good measure.)  I wanted instant results, at least to some degree (it will still have to grow in and really fill in, this is just a start), so I didn’t use solely a moss sludge, but for details on how to go this route, check out the following link:


http://wp.me/p2YY9u-cU


Now that you’ve seen how to make it, I’d like to tell you a little more about the history behind it.

After completing the transaction, the woman running the sale and I chatted further, and details began to emerge that made my recent acquisition seem all the more precious.  What follows is the Reader’s Digest Condensed version of the story that she shared.


Her parents, both from the Ukraine, met in New York and fell in love.  Her mother, a free-spirited creative type, was an avid gardener and artist.  There were examples of her pottery throughout the sale.  The items she had amassed over her life were varied and interesting.  Some of them rough, some of them refined.  Most of them interesting.  The head was made by her mother and the model was her father.  Sweet story.


Now I am loving this item more and more.


Then she continues.  Her parents (separately, having not yet met) left the Ukraine during the Holocaust.  Her father’s story was compelling.  When he was a young man, he was rounded up and packed into a train car with over 100 other Ukrainians.  Everyone on the train was a stranger to him, with the exception of his lifelong best friend.  He and his fellow captives saw little avenue for escape.  The train was speeding along, far from any town, the doors were locked and the only ventilation on the train car was a TINY window at the very top of the wall, near the ceiling, far out of reach of all on board.  The general consensus was that all was lost.


Against the advice of his fellow prisoners he and his friend were determined to attempt an exit through this tiny window.  First his friend, and then he were boosted up by some of the others on board and managed to wriggle through the window.  He was knocked unconscious when he hit the ground for, he believed, over an hour.  His time estimate was based on the frequency with which trains passed through the area and the fact that the noise of an approaching train is what brought him back to consciousness.  Realizing that being spotted by a passing train meant likely death, he scurried away from the tracks and into a wooded area as quickly as he could manage.  He was unable to find his friend, because the train was going so fast that even going one after the other they were far apart.  He never saw his friend again.  He never knew if his friend survived the fall, if he did whether he was able to find his way out of the country or whether he might have been found during his attempted escape.


But the woman’s father did escape.  He left his home and came to the United States.  He met a crazy, quirky and beautiful woman.  He took her to southern California for their honeymoon and she refused to ever leave again.  Refused.  He went back to New York, packed their things and drove back across the country…WHILE SHE STAYED IN CALIFORNIA (this gal wasn’t kidding folks!)  With no job, no home, no clear plan.  He just leapt.  Again.  And when he told the story to his children, or to friends he told the story with laughter and love.  He cherished his quirky wife and her headstrong attitude.


He bought a home, raised his children and lived his version of the American dream.  Because he took a chance, because he flung himself from a speeding train, flung himself into an unknown country and flung himself willy-nilly into his life with his family.


I didn’t ask how he died (it was a true estate sale…both parents were gone) but we know how he DIDN’T die.  It is estimated that upwards of four million Ukrainians were killed in the holocaust.  This man wasn’t one of them.  In the face of one of the ugliest examples of what mankind can be capable, he survived.  And he didn’t become ugly simply because he had experienced ugliness.  He loved.  He lived.


They say that one person’s trash is another person’s treasure.


Well, in this case, one person’s past has become another person’s treasure.  It’s not just another purchase…it is something which will BE treasurED.  It’s a Chia Survivor!  A Chia Hero!


And just in case you are wondering if my repurposing this piece into garden art is disrespectful in some way, I told the woman at the sale (before she told me her parent’s story) what I had in mind and she was 100% on board.  After hearing the story I mentioned that now it seemed a little, well, frivolous.  She disagreed.  She thought her mother, especially, would have loved it.


I know that every time I look at “the head”, I will be reminded of the journey that lead it to my garden.


Fling yourself headfirst at life people!  You never know who you will touch along the way, or even after you’re gone.  Make all of those touches meaningful…touches for which you know you’ll be proud to be remembered!


-Laura  

THE BETTER WAY TO STORE YOUR BLING!

So you say your jewelry needs a home?  Read on my well accessorized friend, read on.


This week’s project is quick and easy, anyone can do it, and (hint!hint! fellas) it’s a great surprise project that will make your significant other giddy with joy!  Imagine the look on your loved one’s face when they come home to find what you’ve made for them!

Do you have too much bling for a small jewelry box, but want something a little more unique than those mass produced jewelry cabinets?  By using a piece of furniture you already own, or finding an inexpensive one second-hand, you can have something much better, for much less!


Over the years I have accumulated jewelry.  Most of it from yard sales. I thin the crop from time to time, but I find that with jewelry, you just never know when you’re going to need that one quirky necklace, that classic cuff bracelet or those Ren and Stimpy shrinky dink earrings (IT COULD HAPPEN!  I MIGHT WEAR THEM AGAIN!)   As I have an affinity for vintage jewelry (and have a more difficult time discarding the vintage pieces) my collection needs a home.


We’ve all had experience with attempting to make jewelry storage work in a small box or drawer.  It doesn’t.  But does this mean we’re doomed to a lifetime of untangling necklaces which have seemingly fused together in one giant mass, or searching in futility for the mate to your favorite earring?


Fear not!  All of your jewelry storage issues can be solved in an afternoon!


Here is a step by step on how to make it happen:

Step 1.  Measure the inside of the cabinet, drawer or drawers you plan to convert.  


Step 2.  Cut foam core  (it’s a bit like poster board, only thicker.  It has a layer of, you guessed it, foam, in between the layers of thick paper) to the size of the drawer.  The size should be pretty darn close to the size of the drawer.  You can go a SMIDGE smaller to allow room for the fabric and batting, but I kept mine within ¼ of an inch.


Step 3.  Lay foam core on top of batting.  Cut batting about 1 ½” wider on all four sides than the piece of foam core.


Sidenote:  In case you’re wondering no, step 2b. was not “have a glass of wine or three”…my pictures just didn’t turn out so well.  Apologies for the blurry ones above and below!  :/


Step 3.  Do the same with the stretch velvet, cutting the velvet just a little wider than the batting.


Side note:  The back of these pieces are not visible at all once they are installed, so I didn’t even try to do a neat job when I was cutting the batting.  My scissors were old and dull and it all looks like a hot mess…, but don’t fret, it doesn’t matter one whit once it’s all in place.


Step 4.  Begin taping first the batting and then the velvet to the back of the foam core.  I have tried this with other projects and duct tape works best, as long as one is not worried about the back of the project looking “clean.”  I have used glue, staples and other forms of tape.  None were as effective.  If it matters to you how the backside of the foam core looks, you can cover it with black felt after you finish.  Start with one good sized piece on the center of each side.  It doesn’t stay in place super easily at first.  It’s more manageable if you enlist the help of a willing friend, or an unwilling teenager who would rather be watching John Green videos on youtube.  Your helping hand can then hold the fabric in place while you tape, or vice-versa.


It is important to pull the batting and fabric taut, but not too taut, or it makes it even more difficult for the tape to hold both in place.  It’s not an exact science.  You’ll figure it out as you go along.  🙂

Step 5.  Continue taping the batting as if duct tape grows on trees, next, tape the fabric as well, until it is completely covered.  Then put several additional layers of tape over what you’ve already done, in order to secure it in place.  On the corners, pull it towards the center, forming a pleat and tape like crazy.  Watch as it slips out of place.  Swear.  Tape again.  Invent new swear words.  Tape yet again.  When you have effectively depleted the duct tape rainforest to such a degree that Pete Seeger is knocking around some ideas for a song about you, add one more layer, and then rest.


Once you’re ready to “hammer out” the remainder of the project, move on to the next step:


Step 6.  Place in drawer.  If you did it just right it should be just a little tight.  That way it won’t slide around inside the drawer.  My pictures aren’t too great…it looks as if the fabric is wrinkled, but I’m not sure why…I think the flash picking up the nap of the fabric.  The stretch velvet actually stayed wrinkle free.


Step 7.  For the left hand side of my cabinet, which was an open space rather than drawers, I added LED tap lighting.  It would have been fine without, but it was a little dark, and not only that, but the lights made things sparkle and look pretty.  These amounted to a decent portion of my budget for this project, around seven dollars at Target for two, but in the end, I think it was worth it.  They install easily with double sided foam tape (included.)


Next I added hooks to the inside of the cabinet doors and to the inside of the open cabinet compartment.  Because this was a reasonably decent piece of furniture, I used Contact brand adhesive hooks, which won’t damage surfaces.  I had an old pine armoire years ago that I used for a similar purpose and used chrome screw in cup hooks.  I actually prefer the look of the cup hooks AND they hold larger items more comfortably.  Whenever I attempt a project such as this one I always try to allow room to grow.  In this instance I added more hooks than I need right now.


For the interior of the cabinet, in addition to hooks and the tap light, I added another black velvet liner for the “floor”, a black velvet jewelry display for necklaces and bracelets, and I also used some decorative dishes for storing extra bracelets.  I found my velvet jewelry display stand at a yard sale for a dollar, but they’re not priced out of reach even at full retail.  They are available in a few different styles and sizes at JoAnn Fabric and Craft stores for between 2.99 and 29.99, are frequently on sale and JoAnn also offers a weekly 40% off coupon for one item.


Here is a link to the JoAnn website showing the display stands:


http://www.joann.com/search/_velvet%20jewelry%20stand/


Here is a link to their coupon page.  There is almost ALWAYS a 40% off coupon.  I used mine for my fabric:


http://www.offers.com/joann/?path=bpa-r2zo-gls-100a1a&ablpid=2344&kw_id=582-417989&k_click_id=1ffda10f-2467-7a69-0372-00004c54e048


You can also get the JoAnn app for your smartphone.  This way you always have the coupon on hand and don’t need the weekly flier.

I tried to keep like items together, pins, earrings, rings, etc.


The wider, lower top drawer was perfect for extra long or heavy necklaces and I also used it to store jewelry cleaning supplies.


All in all, I was pleased with the outcome!


I ended up with two extra drawers, and lined those with velvet inserts as well, because I had enough left over materials.  The extra drawers could be used for sweaters, delicates, etc.  Either way, it’s bonus storage!  🙂


I spent just over 30 dollars for all of my supplies and it was worth every penny!


So, there you have it…your own custom jewelry case is just a trip to the Salvation Army and the fabric store away!

I’ll leave you with this:


“The only thing that separates us from the animals is our ability to accessorize” – Clairee Belcher (“Steel Magnolias”)

– Laura


EYE-“POPPIN’ TAG” PRICES

So you say you’re in the mood for a cup of joe?  Well, don’t start that journey at Goodwill, my arabica bean loving friend.


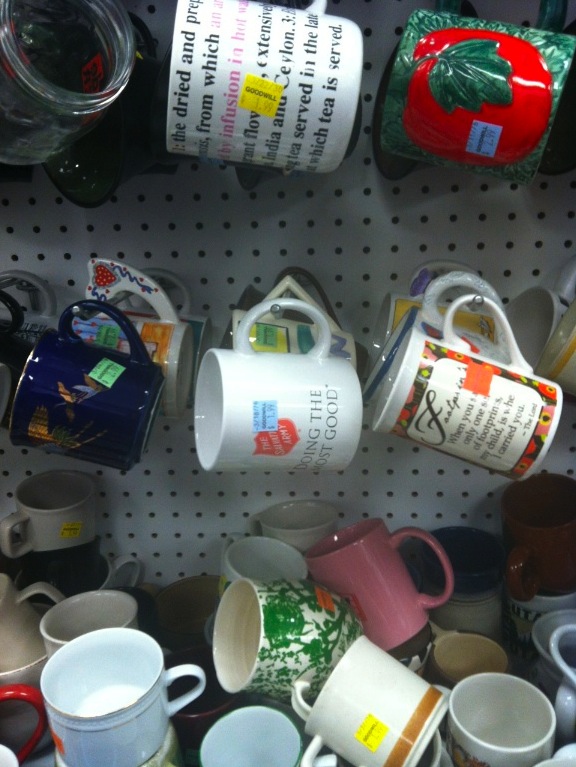
Take a look at the photo.  Go ahead.  Do you see it?  Are you chuckling?  No?  Ok, look again.  I’ll wait.


(*whistles, taps toe, looks around.)


You’re back!  NOW do you get it?  I thought so.


*cue “The Circle of Life”


The above photographed mug, which began its journey at The Salvation Army has found its way to Goodwill and they’re selling it for 1.99.


Now, let me be clear.  I enjoy thrift stores.  More than just a little.  Kind of a lot.  Enough that I’m writing about them.  That said, their pricing practices can sometimes confound and confuse me.


I snapped the above photo at a Goodwill in Tucson, Arizona.  What you see is about 1/6th of the number of mugs they had for sale.  The lowest priced mug was 1.99, most seemed to be 2.99 and they went up from there, and there wasn’t a complete matched set in the ragamuffin bunch.  It was like a Dickensian orphanage for mugs.


This got me to thinking about my penchant for buying nearly exclusively secondhand.  Is that always the most economical choice?  The answer is no.  Not always, and especially not if one is shopping at Goodwill.


Here are a few examples of the retail prices for mugs I found with a quick google search:


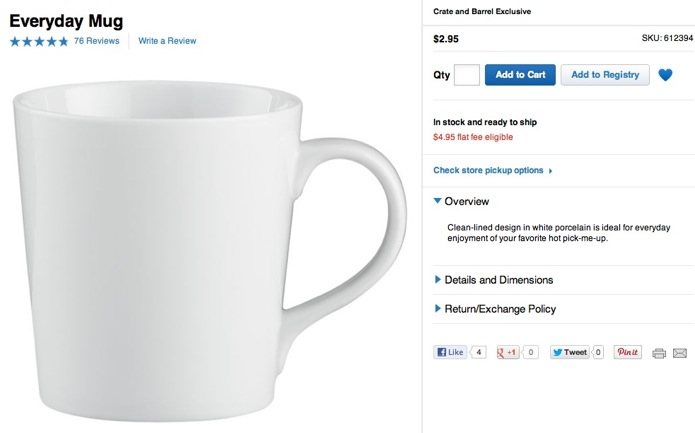
How about a perfectly lovely mug from Crate & Barrel?  Granted, it won’t have any personalized chips on the handle, pre-applied Sanka rings on the interior, or the remains of an unknown user’s Fashion Two Twenty Party Pink lipstick on the rim, but at four cents LESS than the average price for a USED mug at the above Goodwill, you can’t deny that it’s a steal!


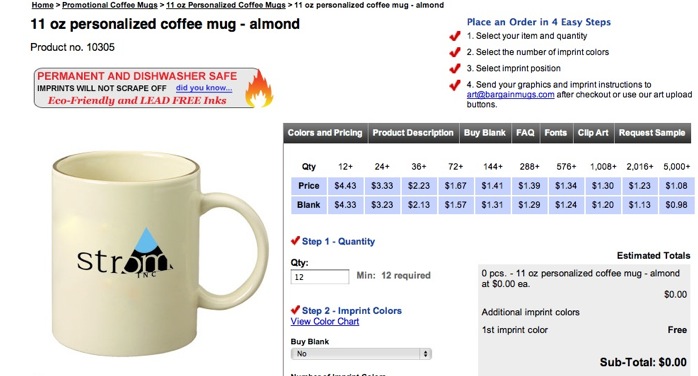
Is a customized mug more to your liking?  You can have one with your company logo, a photo of your grandchildren or “My Tardis Brakes for Yard Sales” emblazoned on the front for a mere $4.43 (or 1.08 if you have need for 5,000+ of them.)  Now, this might be slightly more than the $2.99 you’ll pay at Goodwill, but let’s not forget that they use LEAD FREE inks!  That’s gotta be worth just under an extra buck fiddy.


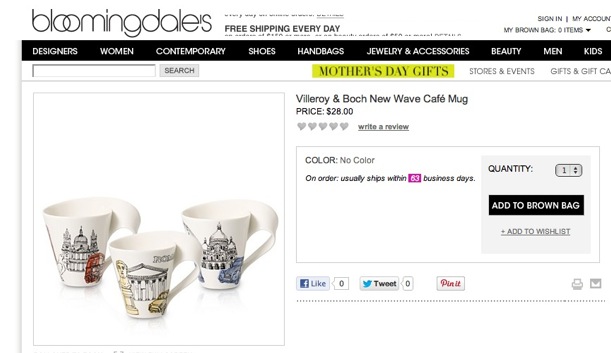
Last but not least, let’s consider the fact that you might want something really special, simply have expensive taste or maybe you throw money around like Lil’ Wayne at a strip club.  You can make it rain at the Bloomingdale’s website…that’s right, BLOOMINGDALE’S.   There you can procure a unique and interesting mug for less than thirty dollars.


Now I put the question to you:  Is the Goodwill mug a bargain?  I would argue that it is not.


The point I’m making is that what appears to be a bargain on the surface, may not really be.  Do your research, pay attention and know what matters to you.  Thrift stores and yard sales are a wonderful resource for creating a beautiful home on a budget, but they’re not the only resource.


While the average American paycheck remains stagnant, or for many has become nonexistent, and the prices on many consumer goods and services continue their seemingly endless downturn (gasoline, milk and pro athlete salaries notwithstanding) the prices at many national chain thrift stores (based on my colloquial observations) have enjoyed a steady spike.  So, what gives?  As far as I can tell, there is only one explanation:  The folks pricing the goodies at Goodwill are on crack.  All of them.  On crack.  Crack cocaine.  However it is that one ingests crack, they’re doin’ it.  They must be doing SO much crack that they’ve lost their foothold on reality.  Just sitting in the back, doin’ crack, and pricing stuff.  Perhaps they REALIZE the prices are outlandish, but they need the money in order to support their dozen cracks a day, Costco-sized portions habit, I don’t know.  I am not an expert on crack.  All I know is that crack has GOT to be a factor.  Right?  Yeah, sure, right.


My mother shops at Macy’s.  She has a Macy’s card.  She has frequently regaled me with  stories of the bargains she has found, such as a perfectly lovely designer top for FOUR DOLLARS and seventy cents (on clearance with Macy’s coupon.)  Now, contrast that with the fact that if I walk into my local area Goodwill and saunter down the long sleeved shirt aisle I can find any number of stained, pilly, out of style Mossimo tops.  The cost?   FIVE DOLLARS and seventy nine cents.  What?  WHAT?  Yeah.  Seriously.


So, assuming that my crack theory is off target, what on earth could lead the powers that be at Goodwill to these ludicrous price point decisions?  Greed?  A complete lack of knowledge of retail trends?  An utter inability to give a s*%@?


Inquiring minds want to know.


In order to prove my point (because, hey, what girl doesn’t want her point proven?) I stopped in a local Goodwill location recently and snapped some photos.  It was NOT difficult to find these examples of rampant crack-headery.  I was in the store for maybe five minutes.  I didn’t even scratch the surface of the UNdeals to be had.  Check it out and get your outrage on:


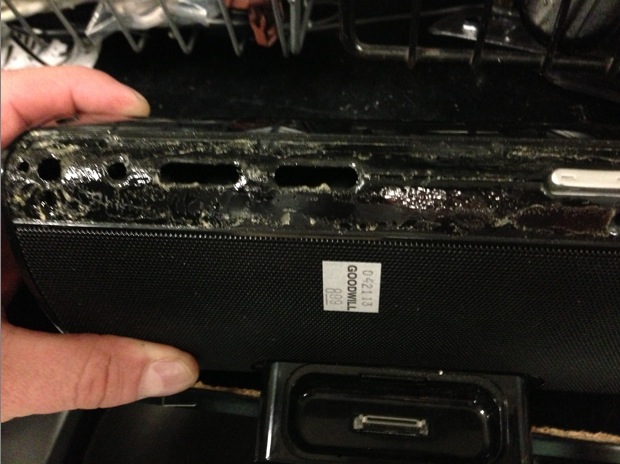
Exhibit A:  Six-year-old iPod docking station. Missing buttons.  MELTED.  8.99  EIGHT DOLLARS AND NINETY-NINE CENTS!!!  I found a brand new iHome docking station online at Office Depot for 21.99.


I could rest my case here, but let’s move forward, shall we?


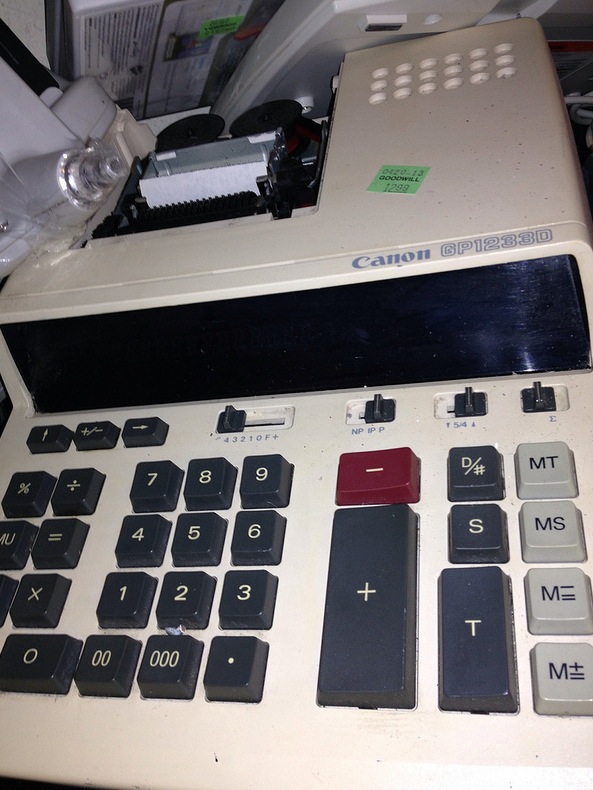
Exhibit B:  Canon Electronic calculator.  Let the record show that said calculator has missing parts, is paint bespeckled, clearly began its life during the Carter administration, is no longer in possession of its red nor its black ribbon and has no power cord. 12.99.


I found a brand new Canon Electronic calculator online with more features for 18 dollars.


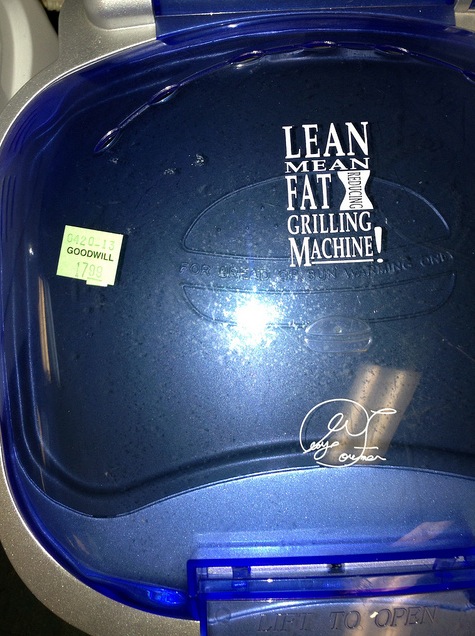
Exhibit C:  Older model George Foreman Lean Mean Fat Reducing Grilling Machine!  Missing parts.  Greasy interior.  17.99.  Yep!  17.99.  Your honor, I object…to this pricing strategy!


I am pretty sure that the number of George Foreman grills on the secondhand market outnumbers the total number of men, women and children living in the lower forty eight states.  I haven’t run the actual numbers, or conducted a poll or done “research” per se, but I stand by my calculations.  I have never purchased a George Foreman Lean Mean Fat Reducing Grilling Machine!, yet I am confident that if I went into my kitchen right now and checked the dark recesses of my cabinets, I would find that one had magically appeared.  Maybe they’re mating when we’re not looking.  Maybe they are an alien lifeform sent here to study our curious ways (and reduce our fat intake.)  Maybe Americans buy a lot of stuff we don’t need….nah!  It’s probably the alien thing.


At any rate, what I’m saying is that there is a glut of George Foreman Lean Mean Fat Reducing Grilling Machines! out there.  If what we learned in high school economics holds true and value can typically be determined by the number of items available vs. desire/consumption of said items (supply and demand) then I am going to go out on a limb and say that this teflon coated item is overpriced.


Here is an example of one that actually sold on eBay recently, keeping in mind that almost ALL of the George Foreman Lean Mean Fat Reducing Grilling Machines! (Whew!  The person who named the George Foreman Lean Mean Fat Reducing Grilling Machine! could never be accused of being overly concise…I am burning fat just typing the name!) of this vintage remained unsold:


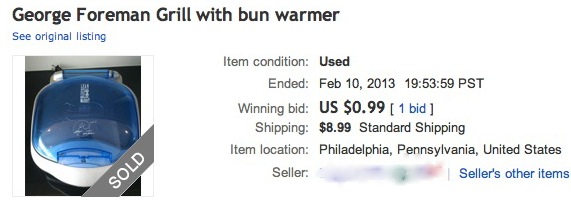
99 cents.  Even factoring in shipping, this lucky (sure, let’s say lucky?) buyer saved themselves nearly half off of the Goodwill price…and it was offered complete, in good condition and with all of its parts and accessories.


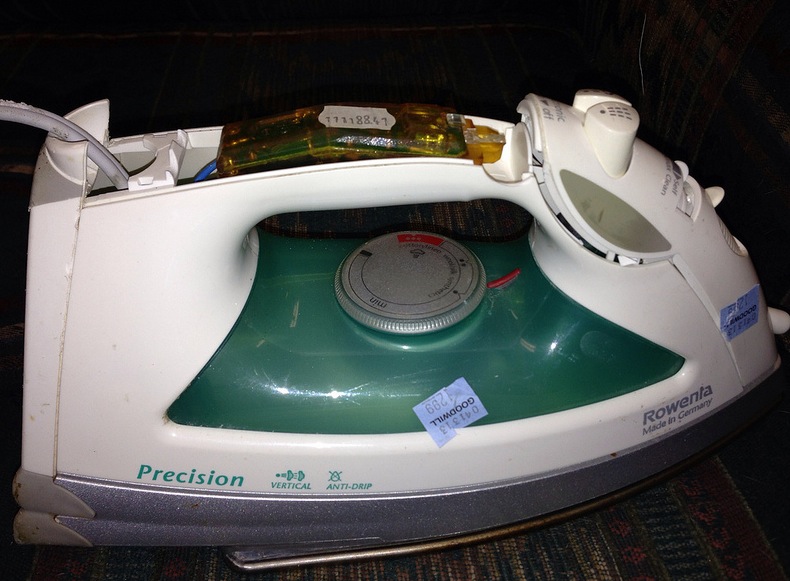
Exhibit D:  VERY broken Rowenta Iron.  12.99.  Sigh.  Ladies and gentlemen of the jury, you will hear testimony that this iron did aid and abet Goodwill in their attempt to willfully and wantonly murder the bank accounts of their customers.


Now, granted, this Rowenta comes with complimentary greasy mystery stains (perhaps it was gettin’ cozy after store hours with the GEORGE FOREMAN LEAN MEAN FAT REDUCING GRILLING MACHINE!  As we’ve already surmised the George Foreman Lean Mean Fat Reducing Grilling Machine! IS all about reproducing, after all)  but I did find a Rowenta iron online at Lowe’s for 31.99.  Lowe’s typically sells its irons WITH the handles attached, so, you know, there’s that to consider.


Madam Foreman (lean mean fat reducing grilli…oops, sorry, it’s force of habit at this point), what say you?


“We find the defendant.  Goodwill Industries GUILTY on all charges!”


Now, all of this said, I must admit that I do still find bargains at Goodwill, but they are becoming fewer and further between.  There are a few locations I no longer bother to frequent, their pricing has become so outlandish.  The prices seem appropriate for about 3% of the merchandise.  The rest is better left behind.  So what has happened?  Thrift stores that are SO packed to the gills, one can barely flip through the racks without sustaining Carpal Tunnel Syndrome, make heads or tails of the precariously stacked dishware, or sort one’s way through the cracked tchotchkes without setting off an avalanche of dust and Home Interiors figurines, that’s what.  What happens then?  Damaged merchandise.  Is it just me, or is this pricing strategy counterproductive to Goodwill’s mission?  These prices are certainly not helping those in need to buy clothes or other necessary goods for their families and I have seen the racks and shelves SWELL with product as the prices continue to rise, which tells me people are buying fewer items.  Would not a more reasonable price move more product and help more people?  The cost behind running the thrift store (rent/utilities/staff/insurance/etc.) does not escape me, nor does the fact that the proceeds benefit other good causes, but I can’t help but think that all would be better served by lowering the prices and selling much, much more.


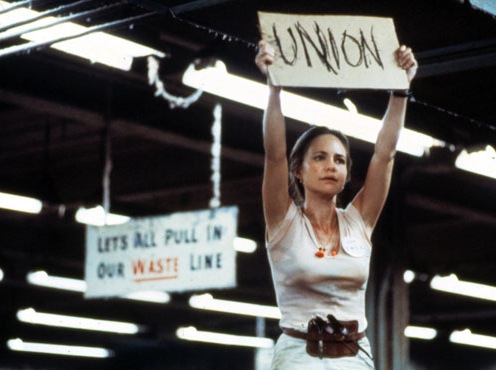
Throw down that pair of high-waisted acid washed jeans, the VHS copy of “Short Circuit II”  and the painfully ugly 1980’s sweater (they’re not ironic anymore anyway, they’re just ugly), America!  Stand on a nearby rickety table and go Norma Rae on their behinds!  Call your regional area Goodwill representative and tell them to stop doin’ crack, get in a twelve step program and get to gettin’ at making amends!


LOWER PRICES NOW!  LOWER PRICES NOW!  LOWER PRICES NOW!


p.s.  My apologies to any of my readers who do crack.  I’m sorry to have associated you with the folks pricing the merchandise at Goodwill.


Godspeed fellow bargain hunters,


Laura


Blog at WordPress.com.

Up ↑