Search

The Home That Yard Sales Built

How to conquer life's obstacles one bargain at a time!

Category

crafts

How to Make an Upscale Chia Pet Alternative in Five Easy Steps or: ONE MAN’S PAST IS ANOTHER GAL’S TREASURE

So you say you long for the nostalgia of ch-ch-ch-chia…but you want a unique and elegant alternative?  Well read on my sprout loving friend, read on!


If you have a pulse you have probably, at some time or another, either owned a Chia Pet, seen a Chia Pet, or at least seen the Chia Pet commercial.  They debuted in the late seventies and are still made today.


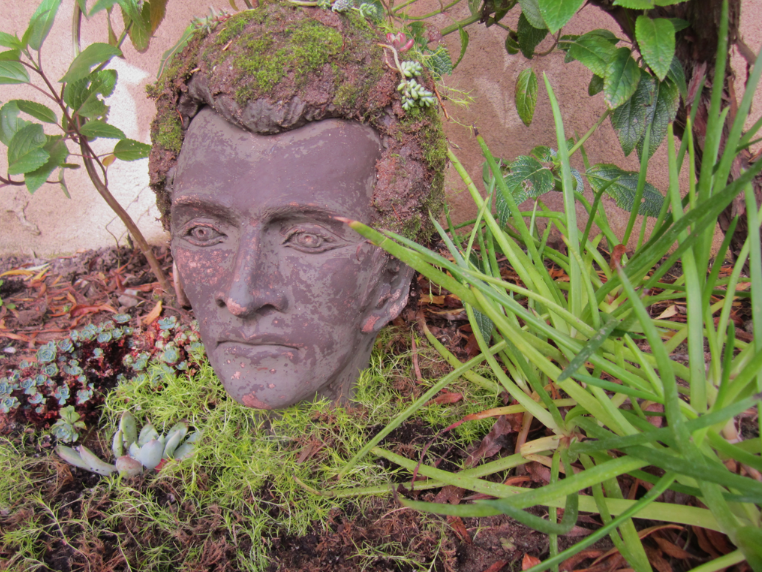
I recently found a treasure that got my mental gears spinning.  It all started when I saw the item pictured below:


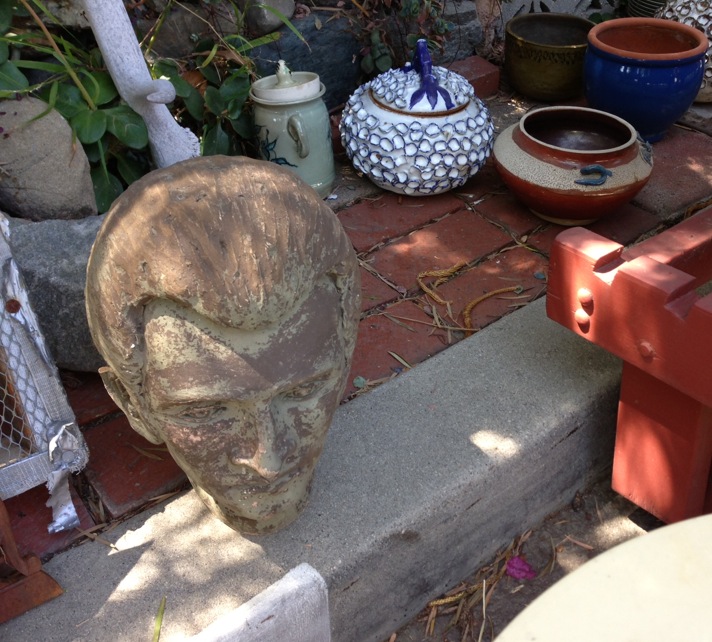
There he sat, at an estate sale in Pacific Palisades, partially obstructed from my view by a table and a set of redwood patio furniture.  I was immediately drawn to this object, for what reason I cannot explain, but I really liked it.  After staring at it for a bit, I realized that the grooves in his “hair” were somewhat reminiscent of Chia Pets and I thought to myself:  “Hey!  I could grow sprouts on that crazy cool head!”  A deal was struck with the proprietress and I was the proud new owner of a well, er, whatever this is exactly.  Not quite a bust, certainly not a statue, but…something!


When I brought it home, my original plan involved Chia seeds.  I even went so far as to purchase some at my local Trader Joe’s.  If you live in a much warmer climate than I, or if you want to grow yours indoors, you could go this route.  As it turns out, Chia seeds need a steady temperature in at least the high seventies for optimal growth.  Night time temps here get fairly crisp, even when the weather is moderately warm during the day, so that was out for me.  I knew I wanted to display this item in the garden.


This was actually a bit of a blessing, because the more I imagined the finished product in my mind, the more I could see that I wanted something a little bit more subtle, a little more refined.  Not that I object to campy or even outright silly, but in this case, it just didn’t fit.  I didn’t want the objet d’garden art to look like a chlorophyll rich Phil Spector, for heaven’s sake!


I had some things left over from another gardening project and I wanted to use what I had on hand. I had some succulents, including a large flat of a fairly small and low-growing variety. After eyeballing them side by side I came to the conclusion that the succulent ground cover just wasn’t going to work.  I very loosely laid it on top just to be sure, but as you can see, it looked flat out redonkulous.


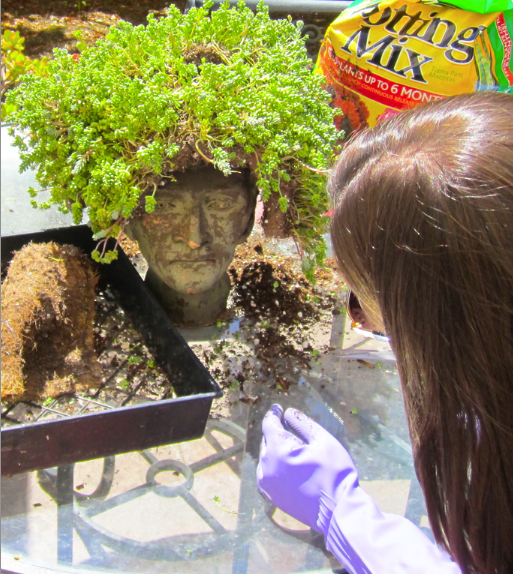
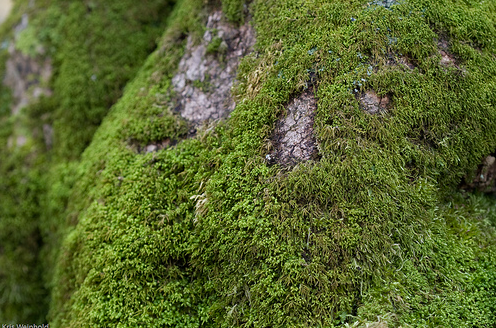
I’ve been a little obsessed with moss lately, so, after a hearty laugh, I went instead with a few different varieties of moss (all gathered from the yard) with a few tiny succulents thrown in for good measure.  Here’s how to make it all happen:


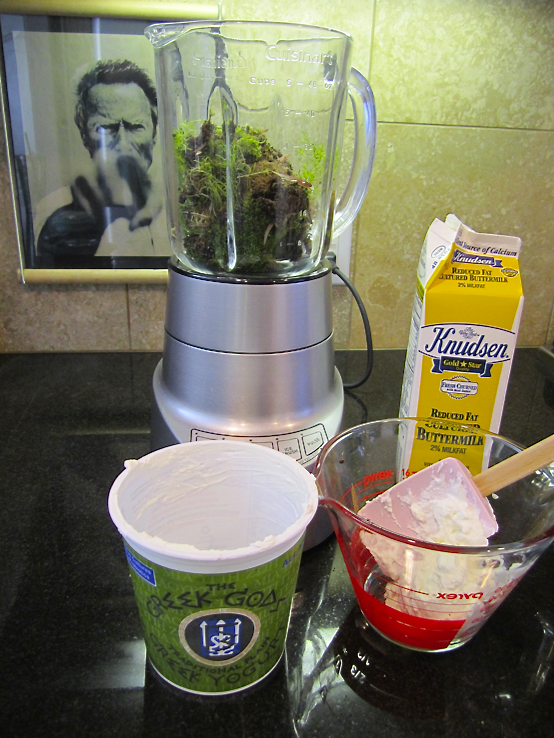
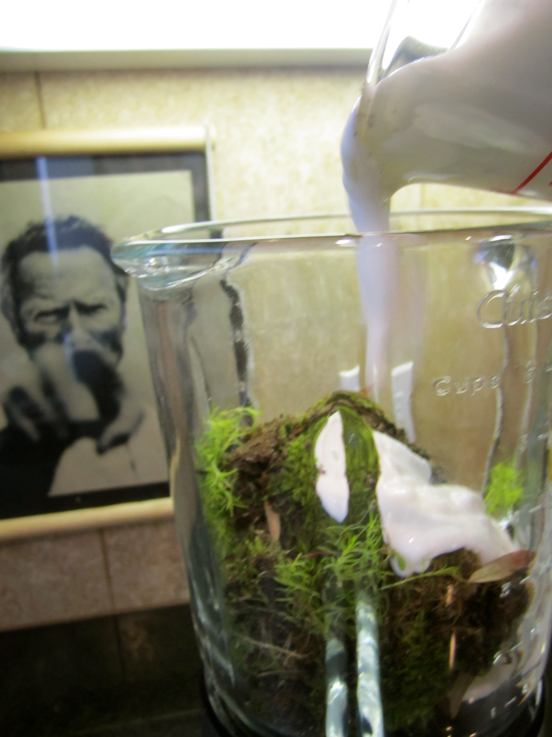
Step 1.  Buy a crazy random item for one dollar.  Mine is a head, but it could be ANYTHING!  You could use a garden gnome, an animal statue of some sort, or something simple such as an orb.  Spritz your item with water.


Step 2.  Apply a small amount of enriched soil on the moistened item.  Spritz liberally once more.


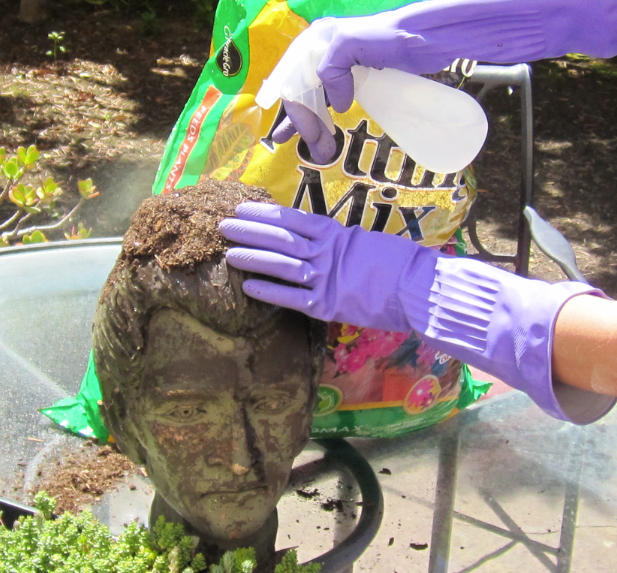
Step 3.  Apply moss in sections, pressing down firmly as you go along.  Spritz the back of each section with water before applying and wet thoroughly after each section is attached.


Helpful hint:  Shortly after beginning this project at an outdoor table, I realized that transport was going to be problematic until it was well established (a couple of weeks at least.)  Even though it was a bit awkward to finish everything with the head already on the ground, I set it into place and finished everything up there.


Helpful hint:  I used three different types of moss because I wanted a mottled surface.  I didn’t want it to look too uniform.  Whatever type you use is up to you.


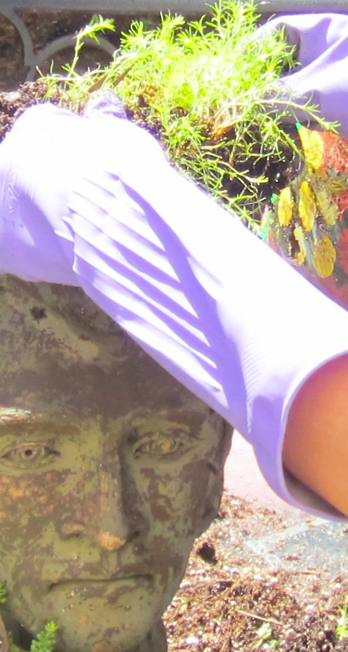
Step 4.  Add a few random succulent pieces.  Base the size of your pieces on the size of the item you’re using.  Mine were quite small.  Succulents are very hardy and quite resilient.  I grow them often by simply breaking off a piece from one plant and shoving it into a pot or the ground…AND THEY ACTUALLY GROW!  No need to root them in water, just let ‘em go at it!


Step 5.  Mist until well soaked.  You’re done!


Some follow-up:

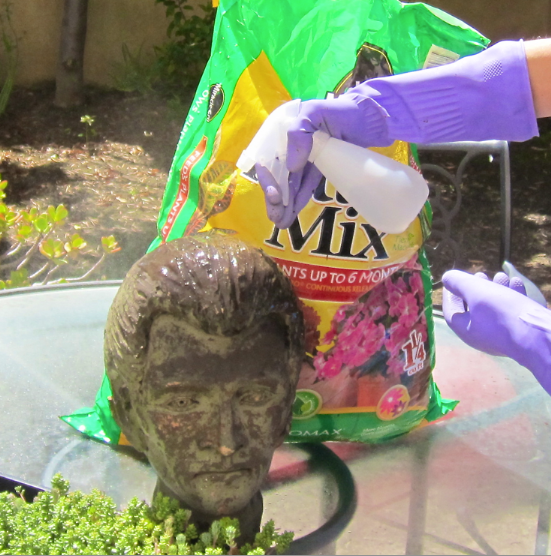
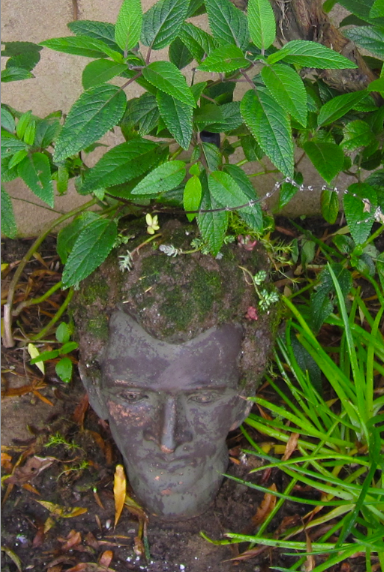
It is important to keep your item well watered for the first few weeks.  Once it takes firm hold you won’t need to be quite as vigilant.  Moss needs very little water and can tolerate more than you might imagine.

After I finished mine I decided the neck looked odd because the ground around it was so bare.  My garden is a work in progress…other than some trees nearly everything in the yard was dead, with no grass, etc.  Since I’m renting, I am keeping my budget as low as possible in the back yard.  So far I’ve found some plants at yard sales and done a few things, but because the ground is still empty overall, I just thought the head needed a little extra something.  Using some moss and unplanted succulents from another project, I filled in just a bit around the base.


Another alternative is to “paint” your item with a moss sludge (I actually went back and added just a bit after steps one through five, just for good measure.)  I wanted instant results, at least to some degree (it will still have to grow in and really fill in, this is just a start), so I didn’t use solely a moss sludge, but for details on how to go this route, check out the following link:


http://wp.me/p2YY9u-cU


Now that you’ve seen how to make it, I’d like to tell you a little more about the history behind it.

After completing the transaction, the woman running the sale and I chatted further, and details began to emerge that made my recent acquisition seem all the more precious.  What follows is the Reader’s Digest Condensed version of the story that she shared.


Her parents, both from the Ukraine, met in New York and fell in love.  Her mother, a free-spirited creative type, was an avid gardener and artist.  There were examples of her pottery throughout the sale.  The items she had amassed over her life were varied and interesting.  Some of them rough, some of them refined.  Most of them interesting.  The head was made by her mother and the model was her father.  Sweet story.


Now I am loving this item more and more.


Then she continues.  Her parents (separately, having not yet met) left the Ukraine during the Holocaust.  Her father’s story was compelling.  When he was a young man, he was rounded up and packed into a train car with over 100 other Ukrainians.  Everyone on the train was a stranger to him, with the exception of his lifelong best friend.  He and his fellow captives saw little avenue for escape.  The train was speeding along, far from any town, the doors were locked and the only ventilation on the train car was a TINY window at the very top of the wall, near the ceiling, far out of reach of all on board.  The general consensus was that all was lost.


Against the advice of his fellow prisoners he and his friend were determined to attempt an exit through this tiny window.  First his friend, and then he were boosted up by some of the others on board and managed to wriggle through the window.  He was knocked unconscious when he hit the ground for, he believed, over an hour.  His time estimate was based on the frequency with which trains passed through the area and the fact that the noise of an approaching train is what brought him back to consciousness.  Realizing that being spotted by a passing train meant likely death, he scurried away from the tracks and into a wooded area as quickly as he could manage.  He was unable to find his friend, because the train was going so fast that even going one after the other they were far apart.  He never saw his friend again.  He never knew if his friend survived the fall, if he did whether he was able to find his way out of the country or whether he might have been found during his attempted escape.


But the woman’s father did escape.  He left his home and came to the United States.  He met a crazy, quirky and beautiful woman.  He took her to southern California for their honeymoon and she refused to ever leave again.  Refused.  He went back to New York, packed their things and drove back across the country…WHILE SHE STAYED IN CALIFORNIA (this gal wasn’t kidding folks!)  With no job, no home, no clear plan.  He just leapt.  Again.  And when he told the story to his children, or to friends he told the story with laughter and love.  He cherished his quirky wife and her headstrong attitude.


He bought a home, raised his children and lived his version of the American dream.  Because he took a chance, because he flung himself from a speeding train, flung himself into an unknown country and flung himself willy-nilly into his life with his family.


I didn’t ask how he died (it was a true estate sale…both parents were gone) but we know how he DIDN’T die.  It is estimated that upwards of four million Ukrainians were killed in the holocaust.  This man wasn’t one of them.  In the face of one of the ugliest examples of what mankind can be capable, he survived.  And he didn’t become ugly simply because he had experienced ugliness.  He loved.  He lived.


They say that one person’s trash is another person’s treasure.


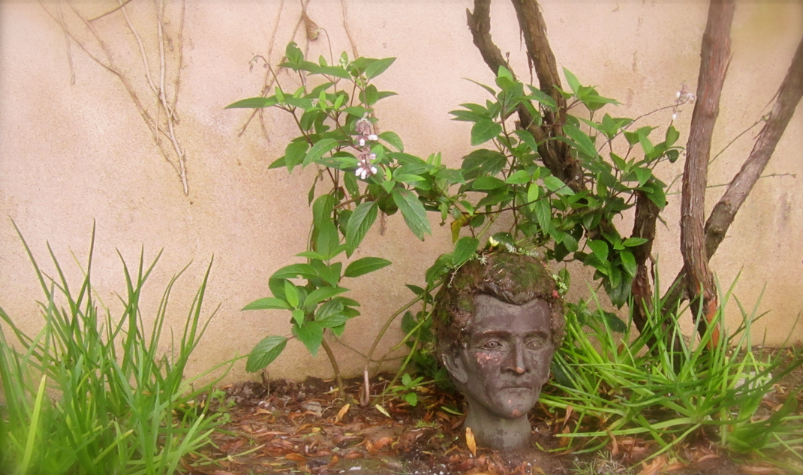
Well, in this case, one person’s past has become another person’s treasure.  It’s not just another purchase…it is something which will BE treasurED.  It’s a Chia Survivor!  A Chia Hero!


And just in case you are wondering if my repurposing this piece into garden art is disrespectful in some way, I told the woman at the sale (before she told me her parent’s story) what I had in mind and she was 100% on board.  After hearing the story I mentioned that now it seemed a little, well, frivolous.  She disagreed.  She thought her mother, especially, would have loved it.


I know that every time I look at “the head”, I will be reminded of the journey that lead it to my garden.


Fling yourself headfirst at life people!  You never know who you will touch along the way, or even after you’re gone.  Make all of those touches meaningful…touches for which you know you’ll be proud to be remembered!


-Laura  

GROW YOUR OWN MOSS FOR GRAFFITI AND MORE!

So, you say you want to propagate some moss on a rolling stone?  Well read on…


This simple recipe works for growing moss on rocks, planters, walls, garden statuary, pots and more.  Whether you’re in the mood to tag your house with some kick-a%& moss graffiti or are looking for a more traditional approach, the most cost effective way to get started is by making a moss sludge (milkshake/slurry.)


There are many, many resources online for propagating moss, this is the recipe that I have used.

You will need:

* Moss

* Yogurt

* Buttermilk

* An item you wanna “moss up reeeeal good.”

*Paint brush and/or spatula

*Rubber gloves (it’s up to you people…if you want to forgo the rubber gloves and live like animals, I’m not going to stop you.)

*Snacks…you always need snacks.

Step 1.  Gather moss and supplies.  You want a decent amount of moss.  Depending on the size of your project you can even fill the blender nearly full, let’s say ¾ of the way.  I used three different types of moss when I made this milkshake because I  was looking for a variegated pattern, but using more than one type of moss has the added benefit of giving the moss more chances to do well in your yard.  You never know which variety will take hold best, and this way you are throwing a wider net.  You can gather moss from your own yard (best if you have some, because you know it will grow there), get some from a friend or neighbor, order it online or even buy some at your local home improvement store or garden center.  I used two types from my yard and one type, left over from another project, which I purchased at Home Depot.


Step 2.  Place the moss in the blender and add about two or three cups of yogurt mixed with buttermilk

Helpful hint:  You may add a bit of sugar if you like, you may add a tiny bit of fertilizer and if you don’t have yogurt or buttermilk, you may substitute beer.  You may add beer to the yogurt and buttermilk concoction if you like (again:  wide net) but it’s not necessary.


Step 3. Blend on high until the mixture is VERY well blended.  Some moss enthusiasts prefer a thin mix, I prefer slightly thicker, as I have found that it is much easier to use.

Don’t stop yet…keep blendin’!


Nope, I know you are anxious, but it’s not done yet, keep going!


Helpful hint:  During the mixing and blending process, I kept a few spices on hand, such as tarragon, oregano or even run of the mill pepper.  Not because they are necessary for the recipe, but so that if my daughter wandered into the kitchen while I was in the middle of the project and asked what on earth I was making I could happily chirp:  “DINNER!” and watch the look on her face.  This step is optional, but quite honestly, the most entertaining.


NOW it’s finished!

Do your best to hold back.  I know this looks TOTES appetizing, but do NOT be tempted to lick your fingers or spread it on toast.  You’ll be disappointed.  Just ask my daughter.  If you’re feeling inclined to give it a try, this is a good time to fall back on the snacks you were supposed to include when you gathered your supplies.  I hope you didn’t get something lame like carrot sticks, because you’re going to be disappointed.


Step 4.  Skip your happy self outside and go to town with that nasty lookin’ stuff!  You can use a paint brush, spatula, or your hand (your rubber gloved hand!) to spread it onto walls, onto rocks, onto the ground, yard art, or, if you’re feeling particularly industrious, onto any exceptionally sedentary members of your household.  Baseball season and “Game of Thrones” marathons are two good options for when to attempt that particular project.


Helpful hints:  Most types of moss prefer shade, so try to choose a shaded location to grow your moss.  There are varieties that will tolerate some sun, but make sure that’s what you have if you want to try a sunny spot.  Also, be sure you’ve moved anything you will be removing eventually, such as leaves before you pour/spread it out on soil.


Follow up steps:  Keep an eye on the moss and keep it moist.  A fine misting is plenty once per day until it’s latched on well and seems to be thriving.  Keep in mind that this won’t happen overnight, so hang in there!


If you do “moss up” a loved one, be sure to keep them out of direct sunlight and take plenty of pictures.


Happy gardening!


-Laura

SNOW SHOE SPRUCE-UP or: How to Make a TARDIS Jacket in Five Easy Steps!


So you say your pre-loved item needs to be depersonalized or a less than ideal item needs to be customized?  Well keep on scrollin’, my friend…


Last winter, I needed boots for cold, yucky weather.  My wallet needed me not to need boots for cold, yucky weather.  Clearly, we were at an impasse.


I went to a moving sale.


Said moving sale had advertised “LOTS AND LOTS OF SIZE 6/6.5 SHOS AND BOOTS!”  (The author of the post left out the E, but I was pretty sure I knew what she meant.) Well, hot diggity dog!  Now you’re playin’ my song, yard sale ad posting lady!  I’m in!


I arrived just in time to see a woman walk away with what appeared to be every pair of shoes at the sale.  She had an oversized clothes basket filled with them.  MOUNDED!  OVERFLOWING!


Drat.


Oh well.  Next time.


But then what did I spy with my little eye?  These very waterproof Sorel boots, which appeared to have been worn only once or twice.  They were barely even scuffed on the soles!  Oooooh!  I was giddy with excitement!!!  I raised them aloft in my right hand, pointed to them with my left and was just about to ask the proprietress the price when I saw it.  Scrawled in ink (SHARPIE ink, no less) on the outside of BOTH shoes, the name of the former owner (her daughter I assumed.)


Drat.


Oh well.  Next time.


Hand came down, pointer finger assumed the at ease position.


“I know!” called the proprietress with a shrug.  “Nobody’s gonna buy those.”


I nod, sympathetically.


“If you’re buying that” (she points to the hardcover copy of Bill Bryson’s “At Home” that I have since picked up) “you can have the boots.”


Rrrr?


Yep.  I’m in.


I had no idea how I’m going to get Sharpie off of waterproof nylon, but I was going to try…and try I did!


To no avail.


It wouldn’t even budge!  I couldn’t even achieve success at a slight fading of the marks.


So what now, you ask?


Well here’s what I told myself:  They can’t get worse.  Even if I attempt something drastic and it’s a complete flop, no big deal…they were free and I don’t really want to wear them as is.  A grown woman with her name written on her boots would be sad enough.  A grown woman with SOMEONE ELSE’S name written on her shoes?  Now that’s too far.


Soooo….


Step One:  I grabbed a silver paint pen and a gold paint pen, left over from a project my daughter had done a few months ago and without preamble began drawing daisies on the boots.  I completely obscured the Sharpie scrawlin’s and it really didn’t look half bad!  It’s not fabulous, but it’s passable and the boots worked as a stop-gap measure until I found something better/cuter/less paint-penned.  🙂


Step Two:  There is no step two!  You’re done!  Relax and enjoy the rest of your day!  🙂


Let it snow!


Imagine what you could do with some forethought and a rainbow of paint pens!


This project would, of course, work on a variety of items, not just snow boots.  Keep scrolling for just one of the projects this one inspired my daughter and I to tackle!


After the success last winter with the snow shoes, I found a vintage Members Only jacket at a yard sale this past Saturday.  That, in and of itself, was a pretty righteous score, but the fact that it was blue got me to thinking.  What if my daughter Hadley and I made a TARDIS jacket?


For those of you out there who aren’t Doctor Who fans, I’ll explain.  The TARDIS is The Doctor’s spacey wacey, timey wimey machine.  It looks like a police call box.  If you’re not into Doctor Who, feel free to make a jacket for yourself with Mork & Mindy, The Cat from Outer Space, Alf, or any other alien, however inferior they may be to The Doctor.  Nobody is judging you.  Ok, yeah, we’re judging you.  ALF?  Really?


Here are the easy steps and some pointers for customizing a jacket of your own (no sonic screwdriver necessary):


Step 1.  Gather your supplies:


Get a jacket:  I suggest something in a fabric such as waterproof nylon, Gortex or with manmade fibers.  (The paint is less likely to bleed.)


I am of the opinion that if one is attempting a project for the first time, it’s advisable to start with something in which you have very little invested.  I spent only one dollar on this jacket.  Maybe you have one laying around that you don’t wear anymore, that has a stain or you could pick one up at a yard sale or a thrift store.  (This way you’re less likely to bleed money.)


Get a pencil, an eraser and some paint pens:  We used DecoColor paint pens.  It is important to use permanent (oil based) pens for a project like this and NOT water based…otherwise the colors will run if they are exposed to any water.  It also makes clean up trickier (see below) but there’s no way around that if you ever want to launder your item, spot clean it, or if you live in Seattle.


We found ours at Michael’s Crafts and used the weekly 40% off coupon (available in their flier, online, or via the Michael’s smart phone app.)  These paint markers are available on their website:


http://www.michaels.com/Uchida-DecoFabric-Marker—Basics/gc1666,default,pd.html?cgid=products&start=25


Get snacks:  We made poor choices.  We went with Trolli PeachieO’s.  PeachieO’s are available at Michael’s Craft stores, your local Gas n’ Sip, or anywhere snack time dreams are dashed.


Now that you have your supplies it’s time to get with it!


Step 2.  Look online for a picture of the TARDIS to use as a blueprint of sorts.  This is the picture Hadley found:


We used this picture in an effort to keep things really simple.  We weren’t going for over the top fabulous, just easy and straightforward, because it was the first attempt.


Step 3.  Sketch out what you want to paint in pencil before you make it permanent.  Picasso’s first word as a baby was “piz” (short for lapiz…the Spanish word for pencil) so, yeah, don’t get too cocky here.  If it was good enough for Picasso, it’s good enough for you and me.  If you’re going for something with a lot of straight lines, winging it might not be your best option in this case.


Helpful hint:  Before you start drawing and especially before you start painting, put a piece of foam core (always my first choice if I have it on hand), cardboard, or at least some paper bags or plastic between the layers of the garment and also between the garment and the surface on which you’ll be working.  This obviously protects your furniture, but placing a layer between the front and back of the jacket gives you something of substance on which to press your pencils/pens.  It also protects the front of the jacket from paint that might soak through.


Step 4.  At this point start going over what you did in pencil with paint pens.  In our case, Hadley drew the white outline, I filled in the blue and then touched up the white.  This version is VERY simple, but you could get much more intricate if you have the time and are so inclined.  In our case we are starting the project mere hours before my blog is scheduled to “hit the presses”, so intricate was off the table.  We’ll be adding more to the jacket later, so check back for updated photos.  🙂


Helpful hint:  In our haste some of the paint was smeared.  We tried fingernail polish remover to take out the smears with no luck, but Oops! took it RIGHT off, leaving zero spot or residue behind.  Oops! is pretty great stuff to keep on hand.  It is available at Sherwin-Williams.  I sometimes have trouble finding it, and since one can lasts almost as long as two presidential administrations, by the time I need another can the store where I bought it last has normally stopped carrying it, has gone out of business, or has been replaced by a Starbucks.  Starbucks doesn’t carry Oops!


Corporate bastards.


You might want to take a break at this point.  Wait a few minutes while the paint dries before moving on.  You MIGHT consider Trolli PeachieO’s.  I advise against it.


Step 5:  Go back, fill in, touch up, wear and enjoy!  Allons-y y’all!


Again, check back for a more finished product.  I broke my finger and projects/typing have been a challenge…but there will be more to come soon!


Nanu-Nanu,


Laura


THE PURSE PARADOX or: HOW TO MAKEOVER AN OLD PURSE IN SEVEN EASY STEPS!

So you say you don’t believe me when I say that an unusable purse has value? Well grab a paintbrush, and PTL for second chances.

Not too awfully long ago, I saw a purse.  Okay, okay…maybe some time has passed.  Alright, you know what?  FINE!  Last year.  It was last year.  I’m just now getting around to writing about it.  It was a sweet little winter white, satin Coach purse at a yard sale for five dollars.  Only problem?  It had stains.  At first glance they weren’t apparent, but upon closer inspection it could easily be described as dingy and certainly wouldn’t be an accessory one would be itching to dangle off of one’s arm (it made me itchy just to look at it.)  It was, for all intents and purposes, a lost cause.  I almost passed it up.  Left it behind and never looked back.  “I am far more deserving than a STAINED purse!”, I told myself.  “Clearly the previous carrier of this purse did not treat it carefully, in fact, it almost looks as if they didn’t even care about it at all!”  Logic and reason dictated that this particular little purse was not worth my time.  “Why do you always talk to yourself?” I asked.  “Because I fascinate myself!” I answered.  “And because nobody else is here.” I mumbled.


I began my return trip down the driveway from the garage to my car.  I could find far better purses another day!  That’s right!  Forget you, Coach purse!  Then it was almost as if that little purse called out to me:  “Hey!  Hey!  Don’t give up on me!  There’s more here than you might think!  I am worth your time!  I AM!


Giving in, back up the driveway I trudged, mumbling to myself once more, this time over being a sucker, questioning my sanity based on that fact that I was listening to an inanimate object and completely unrelated, wondering if there were any sour gummies left in the console of my car.


So, I bought the purse, took it home and in my office it sat for a day or two….or three, or a week or three, or yeah, as we’ve established, maybe a few months.  I eyed it on and off, wondering if I had made a mistake.  In the retelling I imagine myself giving it a stare down a’la Clint Eastwood, you know, because I’m a stone-cold bad@#%.  In reality it was more like a few sidelong glances that accompanied some cranial wiggling on how to clean it, alternating with second guessing myself regarding the purchase.  More than once I almost chucked it.


Let it be known that I am the stain eradicator!  If you have a question about laundry, I’m your gal.  One of my superpowers is stain removal.  I’m not sure exactly what the costume would be for a superhero with this power…but I haven’t ruled out the possibility of wearing one (one that I would, of course, hand wash and line dry.)  This purse, however, presented problems.  It was resistant to coming clean.  It was like it didn’t want to clean up nicely!  I couldn’t just attack the stains (and I had experience with this) or the fabric would bubble and buckle (satin fabric with backing…stain removal Kryptonite!)  I tried a few of my favorite remedies in inconspicuous places.  No dice.  The staredown recommenced.  I’m pretty sure the stains laughed evil laughs.  They had plans.  Dark plans.  Bad plans. Wicked plans!  Unfortunately for them, they picked the wrong stain-fighting superhero.


After a few days it hit me.  This purse wasn’t ever going to be exactly what it had been when it started its life unmarred, pristine, and fresh…but maybe if I changed MY preconceived notion about what it had to be, it could be even better.


There were a lot of ways one could amend an item such as this, and we’ll cover other options in future posts, but for now, let’s talk about the painting process.  It’s not as apparent in the photos, but there were quite a few stains and also just an overall dinginess to the purse.  It had lost its former beauty. It was grimy.  It was lifeless.  Here is how it started its life with me (it actually doesn’t look too bad in the photo…but in person it was a bit of a mess):

I set about the process of painting the purse (that’s right…PAINTING it!)


Follow me:


Step 1:  Obtain or retain imperfect item.  Contemplate possibilities.  Consider chucking said item.  Forget to put it out on trash day.  Shrug.  Continue contemplating. What to do?  What to do?

Step 2:  Settle on painting purse with transparent fabric paint.  The results are much like dye, but the application, for an item such as this are less problematic.  The paint I used was left over from a similar project I had done a while back.  I am typically not a hanger-oner of stuff in general, but I loved this product (which was not inexpensive, over ten dollars per bottle at the time) the bottles were still nearly full and I loved the results of the previous project, so I had kept it on hand ever since.  I might have used different colors, had I been buying the paint specifically for this idea, but unsure as to whether the purse would survive the painting process I was unwilling to invest in new colors.  Now that I know that it works, I would.  The reason this paint works, as opposed to traditional fabric dye is that it is QUITE thick and does not need additional water.  Water is what warps and bubbles fabric purses like this.  While there was, of course, some moisture in the product, I was able to keep it to a minimum by applying it sparingly.  I wrapped the handle and zipper pull in Saran Wrap to protect the leather just in case either happened to touch the paint before it was dry.


Here is a link to the fabric paint I used:


http://www.dickblick.com/products/pebeo-setacolor-fabric-paint/


(That link looks vaguely racy.  Heh.  But it’s not.  Really.  Click with confidence in the fact that it is rated G.)

Step 3: Plow ahead.  I started painting, using pink in some places and purple in others.  Using two colors gives it a more easy going/slightly bohemian look, a little more depth and allows room for error, but one could do a solid color as well.  I began by painting the areas I deemed riskiest, such as along the edge of the zipper, where the handle met the sides of the bag and around the leather Coach logo tag on the front.  I used a small, thin, slanted brush.  If you don’t have one in your arsenal of paintbrushes, a flat, slanted eyebrow/eyeliner brush works really well.  The paint I used is water based and washed out of the brushes completely with some soap and water.

Step 4: Look at the mid-project hot mess and second guess yourself again, but then choose to soldier on.  I continued painting, moving to a much larger flat brush.  I painted each quadrant in eighths, switching up and alternating between the pink and purple.  It is important to overlap the colors a little, but not too much.  You can also paint the entire thing in pink and then go back with the purple, but this only works if your colors are similar, as the ones used here.  Another way to go would be to use colors such as yellow and blue, and where they overlap you’ll get green.  Just be sure to test the result beforehand.


Step 5: This next step is optional.  While the paint was still wet I sprinkled coarse sea salt on the purse.  The effect can be as subtle or dramatic as you’d like.  Add it quickly after painting and leave it on for a long time and you’ll get much more intensely mottled effect.  The effect is achieved as the salt absorbs the paint on and around the spot where each granule lands.  As each piece of salt is of a varying size, it gives an imperfect, hand done look.  I put mine on after only a few minutes of dry time and left it on for less than 30 minutes.


Step 6:  While the salt is doing its job, stop, rest, have a cup of tea and ruminate on the parallels between purses and life.

Sometimes this happens in our relationships.  Maybe you and your boss are often butting heads.  Maybe your once adoring child became an angst ridden teenager awash in hormones and seemingly hell bent on convincing you that you’re the antichrist…or at least the anti-cool.  Maybe a relationship with someone you love hit one too many speedbumps and you could never see that person as you once did.  Look again.  Maybe your boss will be a little easier to handle if you realize she might have struggles in her life about which you are unaware.  Maybe your teenager doesn’t enjoy his misery any more than you do.  (Let’s face it, being a teenager can suck.)  Maybe your friend or loved one is ready and willing to replace the speedbumps with wide open highway…but they need for you to climb in the passenger seat and be a willing navigator.  A little compassion goes a long way and a willingness to see beyond what’s broken and have faith in what’s worth saving might be all that’s needed.  No one purse and no one person is perfect.  Perhaps none of these relationships will be pristine white, shiny and new ever again…but if they have good bones and they’re meant to stand the test of time they will.  That is, if, rather than expecting to erase the stains you choose to put them behind you.  If you allow it.  If you get creative.  If you let go of what was and imagine what can be…and then follow it up with action.  Be an active participant in the rejuvenation project.  Expecting dramatic change from anyone with whom you interact without also putting some time in yourself is an expectation doomed for disappointment. Now, of course, you could keep going out and getting a new pristine “white purse” (spoiler alert…we’re not talking about purses anymore, people) every year…but no matter how careful you are, every white purse is going to become stained at some point.  It may have been mistreated by previous owners, it may have hidden its blemishes behind designer logos, or maybe you just tossed it carelessly in the back of your closet and forgot about it.  Remember that to someone we ALL were once a pristine white purse that became a little dingy.  Don’t you want a second chance at life?  Don’t you want a chance to be colorful; a chance to be seen as worthwhile as you really are?


So, rather than throwing out your current purse and buying a new one every six months, maybe colorful, beautiful and built to last is better anyway.  I can tell you that I think it is (scroll down for a photo.)


Grab a paintbrush friends!


<3!


Laura


p.s.


Step 7:  Step back and admire your work. It might not be right for just anyone, but I think it’s perfect!  (FYI:  It is less vivid and a bit more subtle in person…I have yet to master iPhone photos.)


Blog at WordPress.com.

Up ↑