Search

The Home That Yard Sales Built

How to conquer life's obstacles one bargain at a time!

Category

budget

RAINY DAYS AND MONDAYS GOT YOU DOWN?

So you say you woke up hearing the song stylings of Karen Carpenter playing in your head?  Well, me too, my friend.  Me too.

Well, not exactly.

Don’t get me wrong.  I actually love rainy days, and I adore rainy nights (*cue Eddie Rabbit), but when that rainy day is a Saturday, well my adoration of rain becomes a love/hate relationship.

I’ve missed yard sales three weekends in a row.  THREE.  In a ROW!  Let me explain through an appropriately erudite analogy, if I may:

If my Saturdays were The Price is Right, by 8am this past Saturday the little lederhosen wearing mountain climber yodeled his way right off the cliff.  No La-Z-Boy Morgan recliner, no Howard Miller Vercielli grandfather clock, no Aqua-bot pool cleaner.  Nope.  Not even a copy of the home game or some lousy Rice-A-Roni. Maybe I wanted some Rice-A-Roni! I mean, IT’S THE SAN FRANCISCO TREAT, for crying out loud!

I don’t skip yard sale days.  I don’t.  Let me give you a list of some things that  have not kept me from yard sales in the past:

Inclement weather (if you’re brave enough to haul it out and put little fluorescent stickers on your unwanted stuff, I’ll be polite enough to show up.)
My own birthday (never underestimate the power of chirping “IT’S MY BIRTHDAY!” as you approach a sale to earn you a discount)
Holidays (religious and otherwise)
Non-contagious illness (it’s called WALKING pneumonia for a reason!  Walk it off, Champ!)
Doctor Who marathon (I’ll record it)Threat of a zombie apocalypse (albeit a small one…chance, not a “small” zombie apocalypse…is there ever a “small” zombie apocalypse?)Houseguests (they’re welcome to come with and usually do)Parties (who schedules a party before noon on a Saturday anyway?  Stop doing  that.)

Sporting events (whew!)

Lack of funds (what do you think that change jar is for…parking meters?)

In a typical year I might miss four or five Saturdays.  We haven’t even cracked the seal on February and I’ve missed three!  So, what has led me to this lowly state?  I’ll tell you!  Acts of God and Pestilence!!  Ok, two weekends of steady downpours bookending a Saturday spent fighting off the flu.  Now, on those two rainy days I would have been happy to head out into it, if anybody in my area had had the common decency to haul their unwanted items to the garage and roll open the door, but can you believe most people seemed to think that wasn’t a good idea?  Pfft.

I’ve discovered that the disappointment of missing a few weeks in a row has had a cumulative and ever widening effect on my psyche.  No yard sales means missed opportunity.  Missed opportunity means lack of inspiration.  Lack of inspiration means lack of motivation.  Lack of motivation means inertia.

It’s not surprising, but is a bit of a low blow that these days have happened along during a particularly trying time in my life.  So, this set me to thinking about how common the downward spirals toward inertia are for all of us.

Most of us have experienced it.  It can be something as monumental as the death of someone close to you, or it can start off as small as a speedbump.  Maybe a friend let you down.  Maybe your transmission went out and you couldn’t afford to fix it.  Maybe Trader Joe’s decided that their “Pleasantly Tart” non-fat frozen yogurt (Pinkberry knock-off) is a seasonal item and you don’t DESERVE to have it in December, even though you enjoy it’s pleasant tartness year round!  Whatever the PERFECTLY LEGITIMATE reason you may have for feeling a little down, it can sometimes grow to much larger proportions.

You may have noticed the lengthy gap between my last blog entry and this one.  It was one of those times.  Luckily, I’m not a litigious person, so Trader Joe’s can rest easy, but let’s just say this girl could have benefited greatly from some yogurty goodness to ease her burdens a bit.  I’ve made my own frozen yogurt, but somehow it’s just not the same, and according to the AMA, sating my unrewarded craving for fake Pinkberry by powering back an entire 56oz party sized bag of M&Ms in one sitting could be “deadly.” (*eye roll)

So, what do we do?  It’s different for each of us, but I’ve found that what has always worked for me in the past was to combat the inertia with a project.  The project was seldom what I should have been doing, but if I felt unable to do what I should, at least I would do what I could.  This was very effective.  I recommend it highly.  Many a bathroom has received a coat of paint by my hand while under the influence of disappointment.  I found that the pride of finishing something would propel me towards doing more and more.  It created forward momentum.

When I am forced by unforeseen circumstances to miss a yard sale day, sometimes I’ll hit a thrift store or two, maybe I’ll look around for something I procured at a yard sale in the past with a project in mind and work on that, or even better…clean out a few closets and start gathering some things for my own yard sale!

That said, I’ve discovered recently that there is also a certain amount of quiet productivity that comes from allowing yourself the space to just be.  You don’t have to wallow in whatever is causing you pain, in order to fully experience it.

These times will come and go.  We can either sink into despair, or pay attention to what the universe is telling us.

That, and paint the bathroom.  Seriously.  Consider it.

Get out of bed, put on your lederhosen and COME ON DOWN!  In the game of Plinko that is life, you have unlimited chips…you just have to play them.

The Provenance Makes it Personal

So you say it’s all just used junk?  Well, I happen to disagree, my friend!

WHY THE STORY BEHIND MY “STUFF” MAKES ME SMILE

I like pretty things.  In a lot of ways, it’s as simple as that.  Who doesn’t?  I think we can agree that pretty things are, by and large, universally liked.  You’ve become pretty jaded if you start saying:  “Ugh.  Pretty things?  Pfft.  No thanks.”  That said, that’s not the only reason the things in my home make me happy.  Obviously some things have a place here because they’re practical.  Quite a few things are in my home because they make me giggle.  There is one thing that almost all of the items in my home have in common and that is that they have a story.

This vintage crystal dish was a recent aquisition:

  It was a chilly Sunday afternoon and my daughter and I were out and about.  We went to an estate sale, which, having been held Friday and Saturday as well, was in it’s final death throes.  At most estate sales, by the end of the day on Sunday the carcass has pretty much been stripped clean, the bones left to dry in sun.  The first hour or so of an estate sale is a frenetic feeding frenzy.  Folks are hopped up on the adrenaline that can only come from the thrill of possible treasure, filling their arms with pre-loved riches and rushing from room to room snatching up lace doilies and mismatched kitchenware as if they’re on some real life, musty scented version of “Supermarket Sweep.”  By Sunday afternoon, a random shopper will wander through occasionally, mostly with looks of disappointment or scorn, surveying what meager offerings remain, eyeballing the poor soul having the sale almost as if it is a personal affront to them that nothing is left.

This particular sale, much as it’s proprietress, had retained some of it’s youthful beauty.  In my, never to be humble, opinion, there were a few reasons for the quantity and desirability of what remained:

1.  Location:  Not only was the property off the beaten path, but the GPS map was even a bit “off” in how it displayed the street, which was actually more like an alley.

(Side note:  Always keep a graphic street guide handy folks!  Don’t become so dependent upon GPS that you forget how to read a map.  In the event of a zombie apocalypse, do you think you’ll have GPS?  No!  Hope for the best (no zombie apocalypse) prepare for the worst (zombie apocalypse) and you’ll be better off for it.)

2.  There were very few signs.  What signs there were had been poorly placed and had no arrows.

3.  The prices were high.  Not “have you been smoking crack?” high, but pricier than the typical yard sale clientele are eager and willing to pay.

4.  The prices were high because her things were VERY nice…however, because they weren’t nice in a flashy or ostentatious way, but were nice in an elevated and refined way, a lot of patrons were overlooking their value.  She knew what she had and wanted a fair price for those things.  For instance, she had a leather bound Bottega Veneta organizer.  Now, had it been a Louis Vuitton organizer swimming in “LOOK AT ME!” LV logos, it would have been snapped up early on.  Because its mark was embossed, quietly, on the inside, shoppers had passed it by.

4.  On Saturday, when I had first visited the sale, the woman hosting it was, well, let’s say not bubbly.  Ok, why mince words?  She was flat out unfriendly.  It seemed as if the process of people mauling her treasures, approaching her with said treasures, which she had carefully accumulated over a lifetime, and offering her 25 cents each for them had in some way offended her and affected her mood.  Who woulda thunk it?

So, for all of these reasons, my daughter and I, the only people browsing at this point, found ourselves oohing and ahhing over some pretty fantastic stuff.

The crystal dish above was an item I had seen on Saturday.  At that time the woman hosting the sale, a beautiful woman in probably her late seventies, who my daughter described as having “great style and the perfect glasses”, had, when I chirpily asked the price, snarled at me that it was “Twenty dollars and not a penny less.”  On Sunday, her mood had softened.  She was lovely.  The stress and anxiety of Saturday had left  her and she chatted freely, sharing stories of every item on which we commented.  I touched the dish on Sunday and she told me that it sat on her mother’s coffee table for decades.  Looking at the dish she said:  “Do you like it?  You should have it.  It’s only five dollars.  Please take it.”

I have to say, I had no business spending even five dollars that particular day, I went because I thought we might find some things that my daughter wanted.  But in that moment, I grew attached to the dish.  I was enamored with it and with her.  The dish had grace and a casual elegance.  I was impressed with her grace, and her elegance.  Even her only thinly veiled superiority was charming on that day, rather than off-putting.  Also endearing was that she clearly wanted me to have that dish.  Not that she wanted to make the sale, please understand.  It was something different.  Perhaps in her mind it would go somewhere that it would be cherished, rather than hauled off to Goodwill.

I paid it.  I gave her five dollars.  I brought it home, washed it, dried it and set it out, and guess what?  I do cherish it.  The crystal has soft gentle curves and feels almost silky when I touch it.  The lid’s finish is imperfect and I love it’s aged patina.  When the light hits it, it explodes in a rainbow of colors.  It feels to me as if it belongs in my home.

As much as I cherish the dish, what I cherish even more is that every time I look at that dish, I’ll remember that day.  My daughter and I had a wonderful time, we laughed and talked, we had a lot to say on the way home after the sale…about the house, about what we had found (even about the items we left behind!) and about the woman who we met. She was special. For whatever reason, that day was special to me.

All of these things, all over my house, they have a connection.  To their previous owner, to events in my life during the time in which each item was purchased, to how they connect in ways small and large to everything else in my home.  I appreciate them.  Tremendously.

Have gratitude for all of the little things all around you.

 Every day you wake up and there’s NOT a zombie apocalypse, appreciate it.  😉

A Magical Mistake

 So, you say you can’t afford Christmas presents?

HOW TO TURN A BLUNDER INTO WONDER

 Yesterday I shared how I think when I miss out on a bargain I’ve seen.  Today, I’m going to show you what my daughter did under similar circumstances.  

 My daughter Hadley’s favorite part of Christmas is watching other people open their gifts.  I know, but you can roll your eyes all you want…she really means it.  Even when she was a young child she wouldn’t ask for anything.  She was so wrapped up in the giving that she forgot to care about the receiving.  I don’t know what I did to be so lucky, but I have a really amazing kid.  Every year she spends a great deal of time on gifts for her friends and family.  

(My mother and me…check the rockin’ collar on Mayme’s shirt, y’all.  Pretty sweet.)


 This year, due to circumstances beyond our control, for the first time ever we won’t be with family and she and I won’t be opening gifts on Christmas morning, but we’ve found a lot of other ways to make the season special.  For one thing we’ve saved up several weeks of “The Soup” without watching and we’re thinking marathon!  Oh Joel McHale, you wise-crackin’ tall drink ‘a water, you’re gonna save Christmas!

 Hadley created uniquely tailored gifts for all of her friends, things like mix cds (with her own custom artwork) and other homemade gifts.  For one friend she wrote a story customized just for her.  For one friend, a fellow “Doctor Who” fan, she made two medallions from Shrinky Dinks paper, each in Gallifreyan (if you don’t know what this means, trust me, you don’t care), one which translated into ‘Buddies’ and the other into ‘Space and Time‘.

 There was one gift, though, that she really wanted to give to her good friend Lexi Rose and that was a Harry Potter wand.  A Harry Potter item which required retail goods.  Lexi loves Harry Potter and Hadley was set on giving her a wand.  Nothing else would do.  Not long after she told me this, I was in a Goodwill store and found, of all things, a Harry Potter book of posters and inside the book was a wand!!!  What are the odds?  Hadley wasn’t with me, she had walked next door to get something to drink, but I went to get her, asked if she wanted it and we rushed back.  I was gone maybe three minutes.  MAYBE!   Well, of course you know where this is going.  it was gone.  Vanished.  Snapped up by another shopper.  We scoured the store just in case, but to no avail.   

 Obviously we were disappointed, but nothing was going to keep Hadley from handing over a wand to her friend on the last day of school before Christmas break. This kid puts the T in tenacious.    

 Finally it was decided.  She would find a tree branch (see last Friday’s post…we have nothing if not an abundance of yard waste) and fashion a wand herself.

 Time passed.

 Days passed.

 Other projects were completed and the gifts wrapped, some even delivered.

 Now began the last minute crunch.  My daughter is wonderful.  She is kind, she is compassionate, she is creative…aaaaand she can occasionally fall into the trap of procrastination.  Procrastination makes me nervous.  It makes me so nervous, in fact, that seeing someone put things off is sort of like watching a horror movie.  You just KNOW that vapid, nearly topless cheerleader isn’t going to find the quarterback behind the locker room door.  But you have to watch her walking blithely toward her doom, unable to change the course of events.  So, as the days went by, I would open my fingers from where they covered my eyes and peek out…hoping to see progress.  

 It is my humble opinion that nagging children is by and large not only a worthless endeavor, but when it comes to something such as this, unwise as well.  Hadley is who she is and, She’s not me.  She needs to live her way.  Much like my incredibly talented cousin, she often proves to thrive and prosper in that squeaking in just under the buzzer, last minute slide into home way of operating when it comes to projects.  Both of them manage this in a way that I cannot.  Nerve-wracking?  Yes.  Impressive?  Also, yes.   

 Around 10pm on the last possible night, as Hadley was wrapping the second to the last gift, she went to find a stick and asked:  “What knife should I use for whittling?”  WHAT KNIFE SHOULD SHE USE FOR WHITTLING?  Um, unless we have a stash of Andy Griffith knives about which I am unaware, we don’t have knives predesignated for whittling, and as much as I like Lexi, she’s a really great gal and all, I wasn’t really on board with the bread knife meeting its early demise for the sake of the wand.  

Well, apparently, that was 50 points from Hufflepuff for me, but I redeemed myself by suggesting a pocket knife, which we happened to have, thanks to my grandmother (yes, REALLY, my grandmother) and Hadley set to work.

 Her plan was to whittle the branch into the shape she wanted, stain it and apply a coat of polyurethane.  The late hour left that plan an impossibility, due to dry time.  So what did Hadley do?  She put a coat or two of clear nail polish on it!!  It looked AMAZING!  Then she added red Swarovski crystals on the end (Lexi is team Gryffindor all the way.)  

 You might think that she would have stopped there.  YOU would be as mistaken about that as that poor cheerleader was about NOT running into a slow, scary dude in a hockey mask.  Hadley took the box from a roll of parchment paper, covered it in white paper, printed out an Ollivander’s label (if you’re not super nifty cool and knowledgeable like us, Ollivander’s is the wand shop in the Harry Potter books) and added that to the box.

 Did she stop there??  Nope.  She then wrote a bit about the provenance, history and significance of the wand, printed it on heavy vellum-like stock in a font that looked like handwritten script, rolled it up in a scroll and tied it with twine.

 THEN she was finished.   

 It was sweet.  It was special.  It was one-of-a-kind.  It meant something.  But here’s the part that’s most impressive:  It was nicer and better looking than the one we missed out on at Goodwill the week before.

 I wish I had better photos.  It was late and we were both tired, I snapped a few with my phone,  They look terrible, but believe me, it looked like a million bucks.

 So the next time you miss out on some material object and you’re kicking yourself…kickstart your creativity instead!

Missed it by THAT Much!

 So, you say someone nabbed your treasure?
 
 
A POSITIVE TAKE ON BITTER DISAPPOINTMENT
 

As you pull up to the yard sale, you see it.  You love it.  Even from the air-conditioned comfort of your car, you know you’re going to buy it.For me (most memorably) it was about five years ago and it was a vintage 1960’s lamp.  The base was a white porcelain owl.  The shade was still in great condition.  Boy, was it ever gorgeous.  It wasn’t just that it was vintage, it wasn’t just that the owl had a look on his face as if he had a secret, it wasn’t just that it was in perfect condition, it wasn’t even that I had never before seen another one like it…it was all of those things, but what elevated it was that it was also “fine.”   Neat, kitchy, fun, and oh so finely made.  Ahhhh.I rocketed from my car and sped toward the sale.  I can still see it.  I’m pretty sure a heavenly glow was emanating from the lamp itself and I’m positive I heard a choir of angels singing the hallelujah chorus.  I walked briskly, but, not wanting to appear too eager (thus eliminating any leverage I had when it came to the negotiation process) I didn’t quite run.  I approached the proprietress of the sale, a stately woman who appeared to be, by my best estimation, in her seventies.  She was clearly beleaguered by the entire enterprise of having the yard sale, but seemed to be doing her best to remain civil to the motley crew of customers.  Casually (sure, let’s say casually) I inquired as to the price of the lamp:  “HOW MUCH IS THAT AWESOME OWL LAMP?”   “Thirty dollars.” she replied.

The mental conversation that ensued between my frugal self and the part of me that had fallen in love with the lamp took only a fraction of a second and went something like this:

Owl love me:  “YES!  We should buy it”
Frugal me:  “Whoa!  Hold on there cowgirl!  Thirty dollars is a lot of money!”
Owl love me:  “Yes, yes, I know, I know.  You’re right.  Thirty dollars is a lot of money.  WE SHOULD BUY IT!
Frugal me:  “But, see the thing is, I wa…”
Owl love me:  “BUY IT!  BUY IT!  BUY IT!
Frugal me:  “Okay, shhhhhhh.  It’s okay.  Take hold of yourself woman!  Let’s think through what we need right now and consider whether or not we can afford to spend thirty dollars on something we don’t need.”
Owl love me:  “I want that owl.”
Frugal me:  “Yes, I think I have come to see that.  Perhaps it would be wise to offer a lower price.  Certainly twenty dollars is a good place to sta…”
Owl love me:  Step off Frugal.
Frugal me fell silent.
Owl love me (outloud and enthusiastically, with a smile that stretched from ear to ear):  “I’ll TAKE it!”

Beleaguered proprietress:  “Oh, it’s already sold.  A woman bought it just before you asked about it.”

“Mr. Owl.  How many seconds does it take for that lousy so-and-so in the red sweater to snag the lamp I most assuredly was destined to own?”

“Let’s find out.  One, two, ttttthhhREE!  Three seconds.  Get over it.”

Thus ensued the five stages of grief:

Denial:  “Wha?  Huh?  Nooooooooo.  I must have heard you incorrectly.  What woman?  No.  There’s no other woman.  Who?  Her?  No, she would never buy this lamp.  My lamp.”
Anger:  “WHY WOULD SHE BUY MY LAMP?  SHE DOESN’T DESERVE MY LAMP!
Bargaining:  “Maybe she’ll sell it to me!  Maybe if I offer her thirty-FIVE dollars she’ll walk away with that sweet five dollar profit a happy lady.”
Depression:  “Waaaaaaaah!  My, *snif* lamp *snif*.”
Acceptance:  “Crap.  Oh well, I’m gonna miss that lamp.  What else is up for grabs at this sale?”

Why did the woman running the sale tell me how much it was if it was sold?  Why had the universe taunted me with this treasure only to rip it from my grasp?  Why oh WHY did they cancel “Firefly”?  (Whenever I’m bemoaning and why’ing, I always ask that last question.)

I’ve thought about that lamp a few times since then.  It really was special, as material objects go.  But here’s my take on situations such as this:

A lot of people take the “I wasn’t meant to have it” approach.  For me, it’s different.  It’s not that *I* wasn’t meant to have it, it’s just that in that moment, someone else needed it more.  See the distinction?  It’s not about what I wasn’t supposed to have…it was about what someone else was supposed to have.  Maybe ‘Red Sweater’ had had a really lousy week and that lamp cheered her up.  Maybe her mother had a lamp just like that and it reminded her of her childhood.  Maybe she loves owls more than Kanye West loves interrupting.  Who knows.  The fact is, the why doesn’t matter.  I truly believe that she must have needed it more than I did, and that’s enough.

So, the next time you feel the sting of the bargain that got away, just picture it with it’s new family, happy in it’s new home.

I’m sure the owl lamp’s owner is happy and truly appreciates what she has.

Harrumph.

*grin*

The Christmas Tree Conundrum

 So, you say you can’t afford a Christmas tree?  Well, not to worry friend, do I have the solution for you!

SIX EASY STEPS FOR A NO-COST CHRISTMAS TREE!

 As Thanksgiving gave way to Black Friday and Black Friday paved the road to full on, bell-ringing, jingle-horsing Christmas, I realized something.  This year, for the first time ever, I couldn’t justify the expense of a Christmas tree for my daughter and myself.  Things are tight.  Not just sort of tight, tight tight.  As in, “Pardon me, but do you have to buy two packages of Top Ramen to get the sale price?” tight.

 Not to be discouraged, I set to mulling over possibilities.  What you see below is the end result:

 In October I cleared overgrown ivy, underbrush and all sorts of critter infested debris from the backyard of the building where I live.  Three days of sweat, scrapes and spider bites netted a pile of detritus taller than me (not a great feat in and of itself, as I am shockingly short, but impressive nonetheless) and about the width and breadth of one and a half largish SUVs.  This is all only vaguely interesting until we get to the part where I single handedly dug up, chopped down or tore out by the roots SIX dead trees.  Now you’re seeing where this is going, right?  The trees varied in height from just under 20 feet tall to just over 30 feet tall.  It bears no pertinence to this story, but for the mere sake of bragging rights, I’d like to point out that one of the two ripped out by the roots (by little ole me) was the over 30 footer, but I digress.  

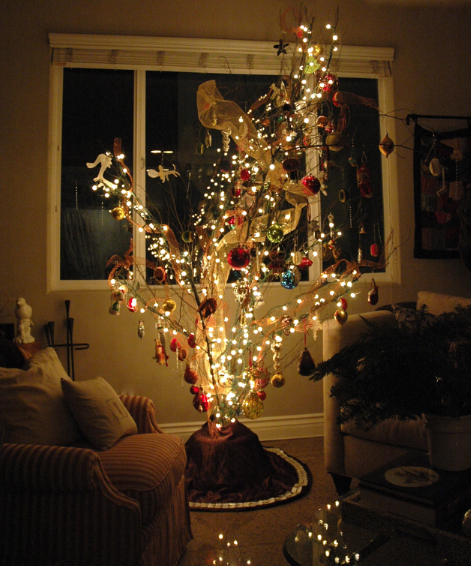
 Luckily, the management company that runs my building isn’t exactly what one might call ‘on the ball’, let’s just say they’re about as interested in building maintenance as Kim Kardashian is in “those heavy things with the pages.” Although I had requested pick-up of this Toyota 4-Runner sized pile of yard waste, and had been assured on multiple occasions that it would be done, still it sat in the backyard mocking me.  I clambered over the pile, extracted the two most interesting specimens and hauled them to the garage.  After some trunk sawing, some limb breaking and some swearing I managed to get them into the house, one in the living room and one in my bedroom.  

 I will save the how-tos for later (see below), but let me say a few words, first, about the why you too might want to take on a project just like this one:

Reasons to create an ersatz Christmas tree from discarded dead timber:

1.  It is economical.  FREE!  Imagine the least you’ve ever paid for a Christmas tree…now let it sink in that even THAT far exceeds the cost of this tree.  Which is nothing.  Nada.  Zip.  Now, parlay that savings (about 80 dollars for a six to seven foot tree, here in LA, at the local mom and pop tree stand I have shopped in the past) into stocking stuffers for the kiddos, a donation to a local toy bank or groceries and you’re ahead of the game.

2.  It is environmentally friendly.  If you’ve used an artificial tree in lieu of the real deal in an effort to suck up to mother nature, reconsider.  Your motives are solid, but the end result is a tree mass produced (probably in China), from chemicals which can’t have done the planet any good in the production stage and, which at the end of its useful life, will spend the rest of eternity NOT breaking down in a landfill.  When you’re finished with the tree in this project your options are many…break it down and use it for firewood, add it slowly to your compost pile or borrow a wood chipper from Steve Buscemi and turn it into mulch.  Many communities have Christmas tree drop off stations, where the flotsam and jetsam of Christmas recently past can be left, free of charge to then be turned into compost and mulch for public areas.  Even if you just toss it in the trash, you’re one step ahead of a tree made from non-biodegradable materials.  

3.  It’s a change of pace and a conversation starter!  “Why, what a lovely and interesting tree you have there!  However did you come to fashion such a delightfully different holiday display?”, your neighbor might comment, to which you can then reply:  “Let me tell you the story, nearby resident! I read a blog on the internet written by a snarky down on her luck single mom and she seemed to think it was a good idea, so obviously I followed suit! DUH!”  

 My daughter loves our tree and so far everyone who has seen it has oohed and ahhed.  One friend even seemed a little disappointed that they had already purchased a tree and said they would love to try it themselves.

4.  You can have a much larger/taller tree than you normally might be able to afford or even find!

5.  It bears repeating…IT IS FREE, PEOPLE!

______________________________________________________________________________

Now, onto the how.  Follow these steps and please refer to the helpful hints that follow before you decide to undertake this project:

Step 1.  Be poor.  If you’re not poor like me, alternatively you could try being thrifty, creative, or simply up for a challenge.

Step 2.  Abandon your sense of pride and convince yourself that a dead tree is a perfectly sound alternative to that passe Douglas fir everyone else’s front window is sporting.  

Step 3.  Find a dead tree.  Not everyone will be so lucky as to have a dead tree lying around in the backyard.  Get inventive.  Maybe a quick drive around the neighborhood will leave you dead tree rich.  Perhaps someone has put one out for yard waste pickup, or maybe they have one still in the yard.  Offer to cut it down for them…everyone wins!  Go to local nurseries, Home Depot, etc. and look for dead trees and ask if you can take one away for them.  They’ll be happy to have it out of the way.  You have to have the courage to ask.  This is something you’ll hear from me again in the future.  

Step 4.  Measure, measure, MEASURE!  Be sure it’s going to fit through the front door and into your space before you attempt to bring it inside.  The nice thing about this type of tree, as opposed to a typical Christmas evergreen tree is that you can chop bits off the top, bottom and sides and it won’t necessarily negatively affect the aesthetic.

5.  Bang the tree on the ground a few times before you take it into the house in order to loosen any dangling bits and dislodge any insects.  The reality is you are taking something that has been outdoors for a long time and putting it indoors.  I found one spider on my tree after I had it in the house, but otherwise, all was good.

Step 6.  Decorate and enjoy!  

(But wait…there’s more…read on!)

______________________________________________________________________________

 Now, some helpful hints (FYI:  These hints apply to the classic vintage tree and the rustic nature themed tree.  Additional hints for the nature themed tree are listed separately):

1.  Depending on the tree you choose, you may have to MacGyver it up a little when it comes to the stand.  I discovered that my tree was too thin for the stand I had on hand, so I wrapped it with kitchen dish towels before putting it in place.  That did the trick.  You could always use Duck tape.  The fact is, unlike a standard fir tree, this tree only needs to a tree stand in order to, well, stand.  You have no need for the water reservoir (unless you have a pet…oh who am I kidding, child, whom you frequently forget to supply with water) so you could even go the very old fashioned route of the wooden slats nailed into the bottom of the tree.

2.  String the lights on the tree while it’s still on the ground.  I cannot emphasize this enough.  This tree isn’t going to be the tree you’re used to decorating.  In some ways it’s easier (no needles in the way) and in others it is more difficult (no needles to hide the wires!)  Although I did my own lights, one method which I strongly suggest to anyone with a willing significant other is to enlist said sucker, er- I mean, loved one to string the lights for you, and then stand nearby directing them and critiquing their work.  Believe me, you’re going to love this approach.  

 Wind stands up each branch (if the tree is small with few branches) or at least on several branches (three to five branches, minimum, based on the size of your lights for a larger tree.)  Don’t hurdle from branch to branch.  Wind up one branch, back down the same branch and then up another branch.  I used a separate strand of lights for each branch, and had a power strip at the base of the tree.  If you are doing only a few branches, make sure to do an odd number (three rather than two, five rather than four and so on.)

3. Make sure to say ‘branch’ as many times as possible during step two.  As an example, refer to the previous paragraph.

4.  Don’t be afraid to lose branches here and there if they don’t work.  Trim it as you go along…while you’re adding lights and decorations if need be.  This tree is not about symmetry and perfection.  Ultimately you will want a somewhat balanced look, but a natural feel.  Much as you would with a potential partner who chews with his or her mouth open, picks their nose or listens to dubstep, feel free to guide this tree to a better version of itself.  

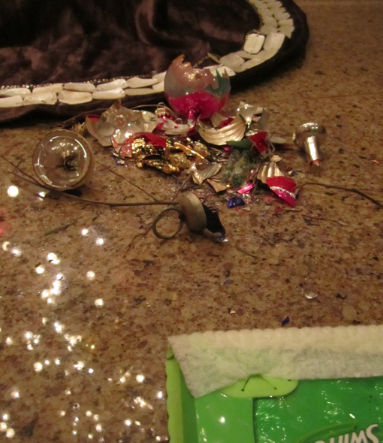
5.  File this one under ‘Learn From My Mistakes’:  Check to make sure that any branches on which you are going to string lights and hang ornaments (some branches will be too small, so don’t worry about those) are STURDY and still well attached.  After spending the day decorating my classic vintage tree (the only part of decorating this year on which I spent any significant amount of time), a few minutes fiddling with all of the accouterment that goes along with Christmas decorating in general, and hours cleaning up, I sat down around 11:00 pm to survey my work and mere moments later heard a CRACK and a CRASH.  One of the limbs, which had been a little “bendier” than made me comfortable to begin with, fell right off the tree, landing on the granite floor.  There was some collateral damage (Oh vintage bulbs, I hardly knew ye!) but all was set right after a few minutes of finagling the AWOL branch into the tree stand.  Better, however, that this not happen to you at all!

6  Prepare yourself mentally, in advance, for the fact that this is not going to play out like every other year.  You have to adjust.  I have an extensive collection of Star Wars and Star Trek ornaments.  (You know what?  You can just stop rolling your eyes right now.  I am comfortable with my nerd quotient, thank you very much!)  For the tree I was attempting to create, they just didn’t work.  I’m not saying it’s out of the question for you, but this project does lend itself to themes (such as nature) or a classic, almost vintagey theme.  I shied away from my most modern looking ornaments and went for those that were antique/vintage (either genuine or in their style), shiny/blingy or natural/rustic.  

7.  Fill it in a little.  It would have looked just fine without the sheer, shimmery net ribbon I wound throughout the tree, but by adding another layer the tree has more depth and a little bit more sparkle.  Being a human magpie, inexorably drawn to shiny objects, I opted for shimmer.  However, there are SO many options.  See my helpful hints for the nature themed tree for more ideas.

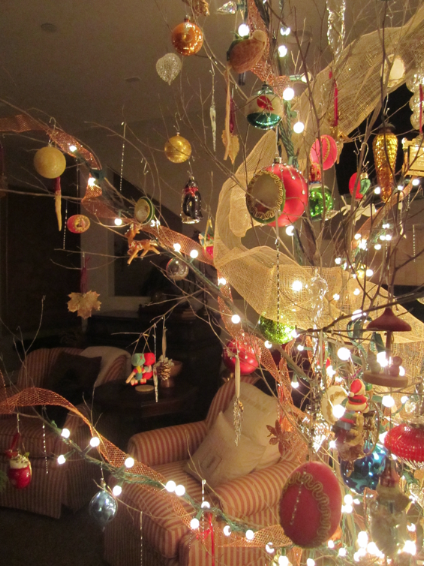
8.  Every tree is different.  The one I had on hand was sort of wispy and had a lot of teeny tiny branches, which weren’t fit to hold tinsel, let alone ornaments.  I broke some off, left the rest and it looks fine, but keep in mind that your tree needs to have at least some branches sturdy enough to hold a lot of ornaments.  I prefer a tree that is absolutely dripping in ornaments, and you may not, but either way, it has to be strong enough for what you have in mind.  Use your best judgement (unless you’re Fred Willard, in which case, ask a friend, colleague or arresting officer to make the call for you, because clearly your judgement is impaired.)  Like me, you may not have the luxury of being picky when it comes to the tree itself, so be flexible when it comes to decorating.  Work with what you have and make the best of it!  Sometimes the happy accidents that come from not having a plethora of choices can bring you to your most creative place!

9.  This tip applies to any tree you’re decorating, whether the traditional evergreen or the one we’re discussing here:  Create a balance with your ornaments, but don’t make it too perfect.  Stand back after at least every third ornament placement and take a look.  Which area of the tree looks bare?  Add more ornaments there.  Is one side of the tree looking a little heavy on red and the other on gold?  Fix that.  Keep larger/heavier ornaments on the lower third and closer to the trunk (but make a few exceptions to keep it a smidge asymmetrical, I can’t emphasize enough that it needs a little bit of imperfection to feel authentic), medium sized on the midsection and the smallest/lightest toward the top.  Mix them all up to some degree, but if you follow that rule for 90% of the ornaments, it should feel “right” when it’s finished.  It’s pretty easy once you start assessing your tree with a critical eye.  You do not need to be a designer or decorator to start noticing things like this.  You just have to pay attention and take a little extra time.  Believe me, it will be well worth it as you stand back when it’s finished and think to yourself:  “Take THAT Martha Stewart!”  You’ll be kicking her behind in no time!  (Disclaimer:  I mean this figuratively and not literally.  I don’t really care who you are, don’t cross her.  I’m pretty sure she could take you, me and the rest of the Internet and come out with nary a snag in her hand-woven sweater.  She’s sort of the Jerry ‘The King’ Lawler of crafts.)

10.  Don’t take it too seriously.  Don’t be discouraged if you have to move a few ornaments or even start over a time or two, in order to get it right.  Do your best and relax…because in the end, it’s just a tree.  Not only that, but it will be gone in a few weeks time.  

11. Use a ladder.  Does this need explanation?  Be careful!

12.  Do not attempt a tree like this if you have:  Curious cats, a rambunctious golden retriever with a destructive tail, really young children who can’t be trusted (read: young children), a loose cannon of an uncle prone to cane waving or if you consider cranberry jello shots to be a legitimate side dish for Christmas dinner (in which case, skip the tree and invite me to dinner.)

______________________________________________________________________________

Let’s talk about the nature themed tree.  

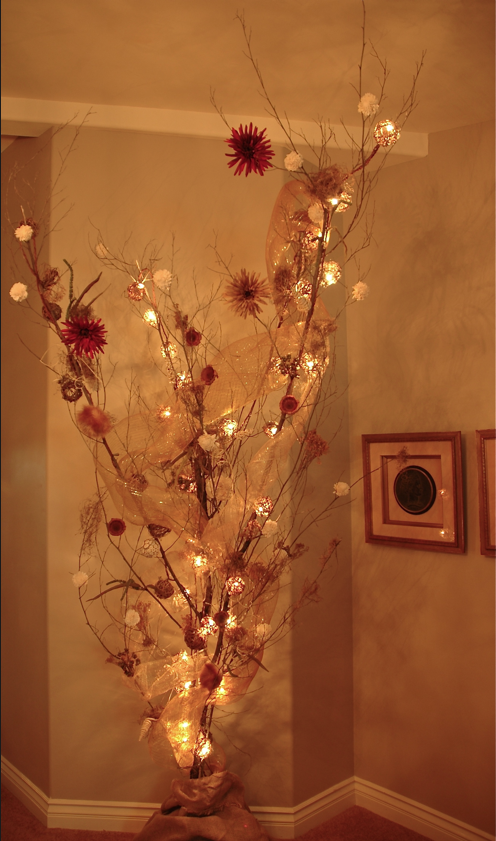
Everything with which I decorated this tree cost me five dollars, with plenty of bits and baubles left over.  I wasn’t striving for perfection with this tree.  Once it was in the stand, the entire decorating process took less than 30 minutes, so keep that in mind when you’re mentally critiquing my work.  😉  Once I knew what I wanted to do, I went to a few yard sales with this in mind.  To recreate what I have done, follow these steps:

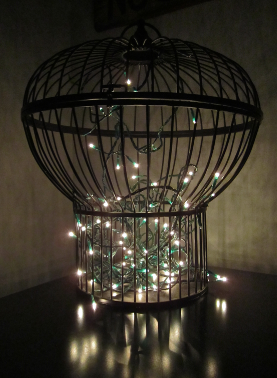
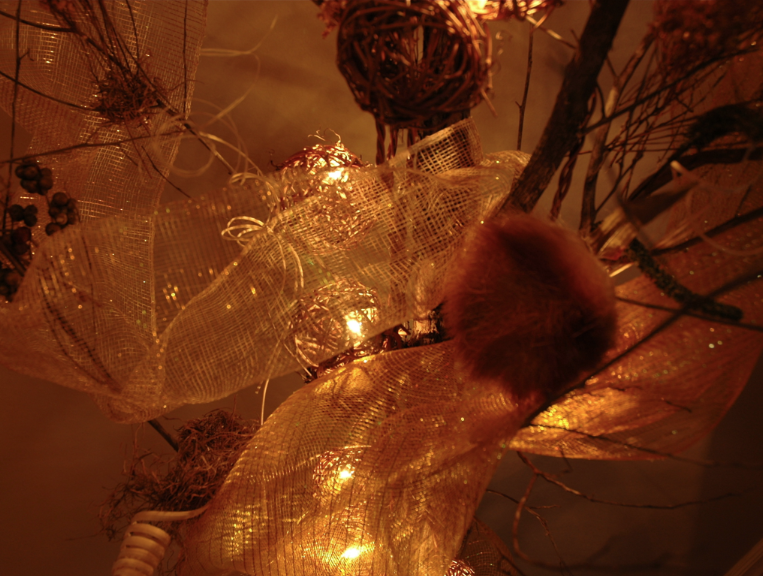
1.  I used strands of mini lights with each light inside of a grapevine ball.  You could find some like this, or create your own by using pre-made grapevine balls (found at Michael’s and other craft stores.)  Just slide one over each bulb.  You don’t need to use lights such as these, but if you can find something that looks a little outdoorsy, garden inspired, etc. that’s super.  Lights with brown cords instead of green are a plus.  One thing about which I felt strongly was that the tree should have a subtle glow rather than a brilliant shine, so I didn’t use many and the lights I did use were diffused even further because of the grapevine.  As I mentioned in the instructions for the vintage tree, string the lights while you have the tree on the ground.  You’ll be glad you did.  

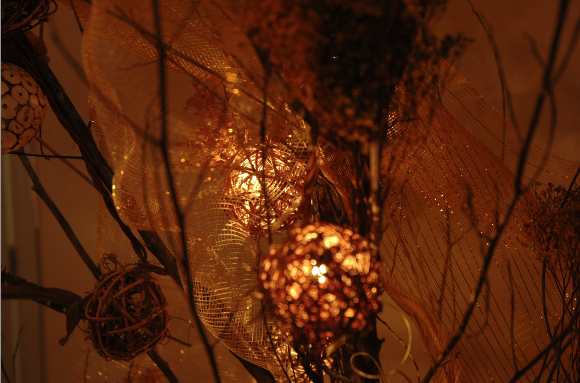
2.  After the tree was in the stand I added layers of very wide, sheer ribbon with a bit of stiffness, so that I could get some purchase against the branches.  Slick, slippery ribbon will make your job more difficult.  I used some with just a smidge of sparkle, because everything else I was using was natural, but I also had burlap ribbon on hand and that would have been pretty as well.  I wound the ribbon up through the tree loosely.  As I was winding it, I tried to visualize how things move in nature: fire, smoke, dust moved by the wind, etc.  This helped to create a look that felt organic.  It also got a Kansas song stuck in my head for about four hours, so visualize at your own risk.

3.  Next I gathered the flora.  Included in my five dollar purchase I nabbed a particularly sad and timeworn basket of flowers, which looked as if it might have been a Thanksgiving centerpiece when it was young and vital.  When you’re looking for things secondhand, do your best to look past it’s current state or how something looks as a whole.  In this instance I ignored the tattered fall leaves and the floral pick scarecrow and zeroed in on the berries, what appeared to be dried, yellow tinted rice flowers, wooden flowers, orbs and other shapes (in deep brown and white) and the Spanish moss that lined the basket.  I pulled the berries off of the stems about midway down, snapped the stems off of the wooden flowers, pulled out some of the faux ornamental grasses and put the Spanish moss into a plastic bag (to keep the mess to a minimum.)

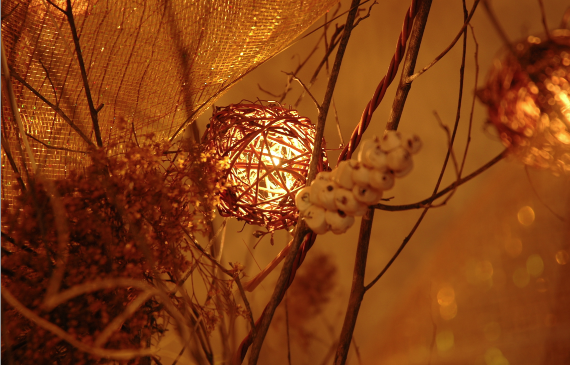
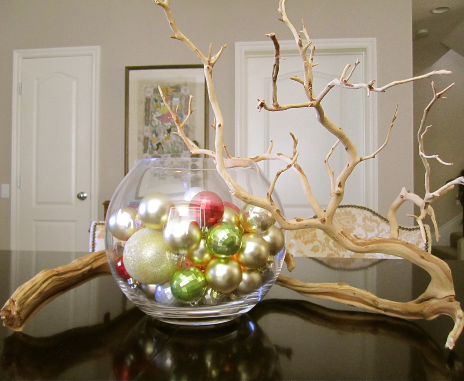
4.  At this point I applied what I had dissected from the basket in stages.  First, I tore clumps of Spanish moss and placed it on the tips of some limbs, and in the crook of some of the branches.  I then added the ornamental grasses, keeping close to the trunk.  I added berries and then balanced the wooden flowers throughout.

5.  Now it was on to the final details.  I had three large daisy type blooms (silk flowers on tiny little clips) in warm, autumnal colors.  I placed those towards the very end of a few branches.  Last, I had three bags of tiny little ivory colored blooms, I have no clue of what these were made, but they felt almost spongy and were very light, thus allowing me to wedge them onto branches and balance them easily on the tips.  

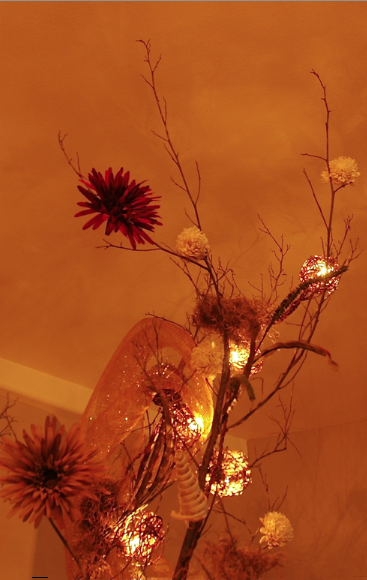
6.  I wrapped a yard of burlap fabric over and around the Christmas tree stand and VOILA!  Done!

______________________________________________________________________________

Helpful hints and tips for the nature themed tree:

1.  Take into account all of the helpful hints from the vintage tree and apply it to this project.  Step back frequently and survey your work, don’t be afraid to remove or start over and work from large to small…placing the smallest items on the furthest tips and the largest items toward the center, but always make a few exceptions, to keep it looking natural.

2.  You can find things for this all over.  Walk into your backyard.  If you have a bush that bears hard berries (and you don’t have pets or small children, or you don’t care for the ones you do) you could cut some of those and use them.  You can use trimmings from various other trees or bushes.  You can gather some moss and tuck it into a few places in the tree.  Put the word out to friends and family that if they have any old floral decorations that they’re ready to discard, you’re more than willing to take them off their hands.  Is your mother’s eyesight failing?  Perfect!  She’ll never miss that arrangement she crafted back in 1989 that’s been gathering dust in the garage, next to a stack of Jackie Collins books.  Yard sales and thrift stores are a great place to find weary dried or silk floral arrangements in need of a new life.  Pick one up for a few dollars and you could easily have half of a tree ready to go!  However, don’t feel as if breaking down and buying a thing or two retail is a failure when it comes to living the yard sale life.  It’s all about making things work, and sometimes that means supplementing a yard sale find with a retail quick fix or two.  If you make a stop at Michael’s and spend five dollars on ribbon or Spanish moss, you’re still doing far better than if you walked into a retail store and purchased everything brand new.  When you do go to a craft store for these types of items, check the clearance area and remember to look at things beyond their original purpose.  You can get great bargains this way.  

3.  When I put my tree together I simply tucked things here or there, wedged, balanced, etc.  A truly industrious sort might hot glue each item into place, but unless you’re making this for year-round use (which one friend pointed out could be done with the nature themed tree), or you just have a thing for hot glue guns (in which case you might consider a twelve step program) it’s probably not necessary.  If you think you might reuse the items after you dismantle the tree, you’re better off not coating the back of each flower with a thick frosting of adhesive.  

4.  Last but not least…one up me!!  I threw this nature themed tree together quickly (under 30 minutes, once it was in the stand), but if you have the time and the inspiration, how could it be done in a way that looks even more ‘fine’, kitschy or interesting?  You could do a small version, add artificial flowers and then spray the whole thing top to bottom shiny white or red (in this instance it might actually be a good thing to use glue).  How about using fresh flowers in tiny little floral water tube picks?  Can you imagine how stunning that would be?  Hmmm…gotta go.  I have another tree to decorate!

______________________________________________________________________________

And one last disclaimer:  I am not a scientist, a home inspector or a ventriloquist (the last having nothing to do with this project, but I’m proud of it and want you to know), so use caution and common sense when choosing to try anything I suggest.  I don’t imagine that this tree is any more flammable or dangerous than any other Christmas tree, but what do I know?  I can’t even make a cranky puppet tell inappropriate jokes.  

The Holidays: A Decoration Conversation

So you say you want to tart up your house for the holidays, but you’re not a fan of ‘effort’?


SEVEN SIMPLE, LOW-COST HOLIDAY DECOR SOLUTIONS!

For those of you who want your home to have the appearance of one touched by the magic from the shimmering wand of a benevolent Christmas fairy, but who have minimal time, creativity or interest in putting your back into the endeavor, I have a few simple projects, most of which take mere moments to implement.  You can whip out a few of these designs and be back on the couch, pounding back a bowl of Cinnamon Toast Crunch and watching The Cartoon Network before you can say Burgermeister Meisterburger.I had all but decided to skip most of the decorating for Christmas this year, when last minute I threw together a couple of trees (see my next post!) and then felt inspired to go a little further, as I knew I would have people over during the holidays.  Other than greenery, which was gathered in advance, most of this was thrown together from things I had on hand and most projects took only a few minutes each.  I wasn’t going for something out of the pages of Veranda magazine, just some simple additions to each room that would make the house feel more festive.

1.  Let’s start with the most simple.  Fill a glass container (large vase, urn or bowl) with ornaments.  I find that if they vary in size and/or color/texture they’re a little more visually appealing, but there is something to be said for a jar filled with small silver or gold ornaments, all the same size and color.  The latter is better for folks who have decor with a more contemporary feel.  You can’t tell in the photo, but I nestle  a candle inside a glass container larger than the candle itself in the center (leaving empty space above it, obviously) and it adds a glow that emanates from between the ornaments and is absolutely beautiful.  I accumulate these through the year at yard sales and thrift stores, so that I can choose only the ones that I really like and at the best price.  Otherwise you’re stuck in an angry skirmish over the last two boxes of crappy ‘shatterproof’  (read: plastic) ornaments on the shelf at Target, fighting off a mean broad with two caterwauling children in her cart and something to prove.  So tell me how you’re going to explain that black eye to your Aunt Ruth at Christmas dinner?  “Oh, this?  I walked into a door…at Target…FIGHTING OVER CHRISTMAS ORNAMENTS!!”  Save yourself the time, the black eye and the uncomfortable conversation and plan ahead.  You have all next summer to watch for them.
Cost for me this year:  Zero
Cost for me based on accumulating items over time:  The one pictured cost me 3.75 INCLUDING the ornaments, the glass bowl, the candle and the driftwood.
Cost for you:  If you play your cards right next summer, only a few dollars per container at most.

2.  Most Christmas tree sellers will give you the bottom branches they cut from trees before they are sent home with the consumer.  Two large branches should be more than enough to fill several vases to place around your home.  In the best case scenario you will have more than one type of greenery (say, Douglass fir and cypress) but one will still be pretty if that’s not possible.  Make one or two large arrangements, for the living room and dining room, and possibly a third for your kitchen if you have plenty of counter space.  For the rest of the house, use smaller vases, or even pretty glasses (for instance tiny vintage juice glasses) and set these on bedside tables, bathroom countertops, etc.  I even put one in my laundry room, because hey, why not?  If you want to step it up a notch, pick up an inexpensive bouquet of flowers (Trader Joe’s has fantastic deals on cut flowers, if you have one in your area, if not, try a floral supply house) and pull a few stems for each arrangement and add them to each vase, tucked into the greenery, just to add some color.  If flowers aren’t in your budget, you can tuck in an ornament or two, depending on size, add some pine cones or even some bare branches, either in their natural state or painted.  This year I kept mine simple, they’re just pine (see above for my commitment to a lack of effort during Christmas 2012), but the sky’s the limit.
Cost:  Cost for me this year:  Zero
Cost for me based on accumulating items over time: The vase pictured cost me two dollars.
Cost for you:  Anywhere from ZERO to five or ten dollars, depending on vessels you already have on hand and the optional supplemental floral arrangement.


3.  Use vintage ornaments in unusual places.  I have one in particular,  made from felt, (an impish little angel) and in the past I liked to nestle her in a basket of towels.  Position a few shiny orbs on a tray on your coffee table. You could hang an ornament from every other shower curtain hook to hang in front of the shower curtain (make sure they’re unbreakable, because they will be likely to hit one another when the curtain is opened and closed.)
Cost for me this year:  ZERO
Cost for me based on accumulating items over time: 50 cents for the ornament pictured.
Cost for you:  Free if you already have some, a few cents to a dollar or two if you find them at yard sales or thrift stores.
 

4.  Tie a bow and/or jingle bell to your dog or cat’s collar.  It’s a classic that never goes out of style.  You can be sure they’re on board when they scratch at it or flail and rub against the carpet after you attach it.  It’s their way of saying thanks!  I’m kidding of course, that would be silly…put them in a red and green I heart Santa Paws sweater instead.
Cost for everyone involved:  Priceless


Disclaimer:  I actually really like adding a little something to my dog’s collar for the holidays.  She prances around happily and it makes me giggle.  🙂


5.  Pile lights into a bowl or other container.  BOOM!  Done.  It looks prettier than it sounds.  I have a few birdcages and I have filled each with Christmas lights in different sizes and shapes.  They look lovely at night and are an interesting and quirky take on the traditional look of lights.
Cost for me this year:  Zero
Cost for me based on accumulating items over time: I paid two dollars for the strand in the larger birdcage a few years ago and less than four for the strand pictured in the smaller birdcage after Christmas on clearance two years ago.
Cost for you:  Zero if these are lights you already own, a few dollars if you pick them up at yard sales next summer, or anywhere from five to 15 dollars per strand if you’re buying them retail.


6.  Never underestimate the power of the genuine article, as opposed to artificial.  The day after Thanksgiving, Home Depot was selling garland, at a HUGE discount, for only five dollars per bundle.  I bought one and it now adorns my staircase railing.  It looks SO much better than ANY manmade garland could ever look.  In a perfect world I like a mixture of different pines, but if I can have only one type, I prefer cypress garland, as it drapes very nicely and has an old-fashioned, traditional feel.  It is easier than you might think to install.  I attached mine to the railing in about three places with green plastic zip ties.  I cut the extra ends off of the zip ties and hid them with the garland itself.  I then used leftover flora from the nature inspired tree I created the day before (see tomorrow’s post), added some ornaments, some glass beads and decorations (I’m especially fond of the clip on blown glass birds on garland) and it was done.  It took very little time and looks incredibly high-end.  Be prepared to spend some time cleaning up needles after the installation, but it’s totally worth it.
Cost for me this year:  Five dollars
Cost for you:  Variable, but worth it.

7.  Light a pine scented candle and call it a day.  What with the end of the world right around the corner, don’t wear yourself out.  “A Garfield Christmas” isn’t going to watch itself, and you have a four serving sized Haagen-Daz
peppermint bark ice cream to put away.
Cost:  Five dollars for the candle, 50 dollars or so per month for cable TV and my self-respect.


All told, I spent 17.75 on this Christmas decor, and most of that was spent over time.  My total cost this year was 5.50. Merry Thriftin’ Christmas!  :)______________________________________________________________________________

So, there you have it.  Some quick and easy tips for last minute holiday decoration frustration.


Salvation Thy Name is Yard Sale

HOW I TURNED A PASSION FOR THRIFTINESS INTO LIVING THE GOOD LIFE ON A BUDGET!


My passion for yard sales and thrift stores began before it was legal for me to drink.  The heady thrill of finding something someone else considered useless and giving it a new home, life or purpose was intoxicating enough to keep me sidling up to the bargain bar for the rest (so far) of my life.  A semi-significant portion of my adult life has been spent either in financial hardship or at the very least, just getting by, but I was unwilling to let the condition of my wallet negatively affect the comfort of my surroundings.  Everything changed earlier this year when I lost my home.  Now, before you feel sorry for me, please wait.  Why?  Because, as with so many circumstances in our lives, what can on the surface appear to be a tragedy, is really a shiny silver lining waiting to reveal itself.  In this particular instance there are many, but the one most relevant to this, MY BRAND NEW BLOG (*say in your best Rod Roddy voice.  Do it.  I’m waiting.  Ok, that’s better, thank you.), is that after I did everything within my power to save it, after I shed many an eye-puffing tear over it, after I felt colossal shame, I realized something: I hadn’t lost my home.  I had lost a house.  A house that another family would buy and then it would be their home, and that part made me happy to imagine, and eased the pain.  However, to paraphrase Scarlett O’Hara, a pretty resourceful gal in her own right: “Wherever was I to go?  Whatever was I to do?”  My challenge was to turn a rented townhouse into my new home…and to do my best not to look back.  And God as my witness my sofa shall never hunger for the sweet embrace of a cozy throw ever again!

I traveled the long and winding road of loan modification only to be turned down by the bank and find myself in a humiliating town called “Foreclosureville” (Which thanks to it’s recent population explosion, might someday be able to improve the infrastructure and do something about all of these one-way, dead-end streets!)

This journey taught me a few things, these two being the most pertinent to this conversation:

  1. Even if one believes oneself to be compassionate, there are always lessons to be learned.


  1. Second, that, no matter how difficult your struggle, there are always other people who need help even more.


I consider myself a fairly strong and capable lady and I have to tell you, foreclosure is a debilitating experience.  How, I asked myself, could some people ever get through this?  What if one was working three jobs (my hat is off to you!),  had 12 kids (heaven help you if that’s you, and if you’re reading this right now…TAKE A NAP!), was chronically ill, wasn’t a native English speaker (Please press two for La casa que fue construida por ventas de yarda), or if one flat out had NO idea how to start over?  There are plenty of organizations in place set up to help you keep your home, but once all is lost, then what?  I have been through a laundry list of ideas about how I could reach out to these very people.  The people with whom I will forever share one of those aforementioned silver linings.

What do I know best?

Well, I know a thing or two about starting over (I’ve done it multiple times), I know a thing or twelve hundred about finding bargains and I would like to think I know at least a little about sharing.  So, maybe, if I put this out there, suck up my pride and share my story, then perhaps some folks who are starting over can get a little inspiration, a little know-how and a little push to get started and build a home.

It took me a long time to openly admit the defeat known as real estate foreclosure.  I had to force myself to speak openly about it.  Even now, this is difficult…I’m sharing this with the Internet!  Do you have any idea just how many friends the Internet has?  Lots.  The answer is lots.  No, whatever you’re thinking, double it.  Actually, triple it, then multiply it by the number of times Lindsay Lohan has crashed (literally and figuratively) multiply THAT by the number of times you’ve heard someone on “House Hunters” say:  “I don’t like the color”, then add another million or two people AND YOU’RE STILL NOT EVEN CLOSE!  What I am saying here, is that there are a lot of people online! Forevermore the Internet will have it on record that I said:  “My name is Laura, and I lost my house.”  However, if my plan is to do something valuable, then by golly, we’d better start out with all of our cards on the table.  (What?  This old thing?  Only solid mahogany….yard sale…35 dollars.  I knooooow, right?)

My mother recently called me The Queen of Making a Silk Purse out of a Sow’s Ear.  It’s a long title, and the crest, I have to tell you is a little off the wall, but I’ll take it.  Check me out Internet, I’m royalty!

So, let’s do this together.  Whether you wish simply to be entertained by the ramblings of a yard sale addict, to check out whatever crazy finds I have unearthed, or if you want to learn the ins and outs of sow’s ear reconstructive surgery, read on.  I hope that this helps some people like me.  Folks who would love to live in a beautiful and special home, but don’t have the money to go about getting there in the traditional way.  Maybe you have plenty of money, but you like a challenge, the satisfaction of doing it yourself or you just can’t find exactly what you want via traditional retail.  That’s great too!  Everyone is welcome!  (except for you Chase bank…I’ve got my eye on you!)

Blog at WordPress.com.

Up ↑