So you say you don’t believe me when I say that an unusable purse has value? Well grab a paintbrush, and PTL for second chances.
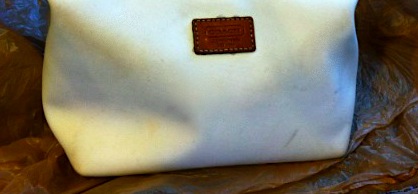
Not too awfully long ago, I saw a purse. Okay, okay…maybe some time has passed. Alright, you know what? FINE! Last year. It was last year. I’m just now getting around to writing about it. It was a sweet little winter white, satin Coach purse at a yard sale for five dollars. Only problem? It had stains. At first glance they weren’t apparent, but upon closer inspection it could easily be described as dingy and certainly wouldn’t be an accessory one would be itching to dangle off of one’s arm (it made me itchy just to look at it.) It was, for all intents and purposes, a lost cause. I almost passed it up. Left it behind and never looked back. “I am far more deserving than a STAINED purse!”, I told myself. “Clearly the previous carrier of this purse did not treat it carefully, in fact, it almost looks as if they didn’t even care about it at all!” Logic and reason dictated that this particular little purse was not worth my time. “Why do you always talk to yourself?” I asked. “Because I fascinate myself!” I answered. “And because nobody else is here.” I mumbled.
I began my return trip down the driveway from the garage to my car. I could find far better purses another day! That’s right! Forget you, Coach purse! Then it was almost as if that little purse called out to me: “Hey! Hey! Don’t give up on me! There’s more here than you might think! I am worth your time! I AM!”
Giving in, back up the driveway I trudged, mumbling to myself once more, this time over being a sucker, questioning my sanity based on that fact that I was listening to an inanimate object and completely unrelated, wondering if there were any sour gummies left in the console of my car.
So, I bought the purse, took it home and in my office it sat for a day or two….or three, or a week or three, or yeah, as we’ve established, maybe a few months. I eyed it on and off, wondering if I had made a mistake. In the retelling I imagine myself giving it a stare down a’la Clint Eastwood, you know, because I’m a stone-cold bad@#%. In reality it was more like a few sidelong glances that accompanied some cranial wiggling on how to clean it, alternating with second guessing myself regarding the purchase. More than once I almost chucked it.
Let it be known that I am the stain eradicator! If you have a question about laundry, I’m your gal. One of my superpowers is stain removal. I’m not sure exactly what the costume would be for a superhero with this power…but I haven’t ruled out the possibility of wearing one (one that I would, of course, hand wash and line dry.) This purse, however, presented problems. It was resistant to coming clean. It was like it didn’t want to clean up nicely! I couldn’t just attack the stains (and I had experience with this) or the fabric would bubble and buckle (satin fabric with backing…stain removal Kryptonite!) I tried a few of my favorite remedies in inconspicuous places. No dice. The staredown recommenced. I’m pretty sure the stains laughed evil laughs. They had plans. Dark plans. Bad plans. Wicked plans! Unfortunately for them, they picked the wrong stain-fighting superhero.
After a few days it hit me. This purse wasn’t ever going to be exactly what it had been when it started its life unmarred, pristine, and fresh…but maybe if I changed MY preconceived notion about what it had to be, it could be even better.
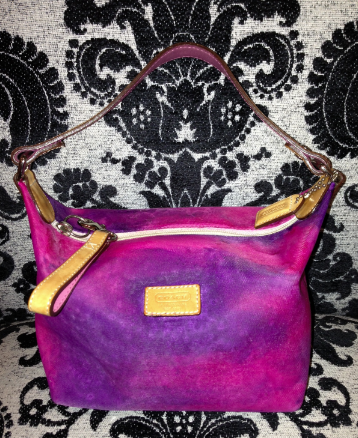
There were a lot of ways one could amend an item such as this, and we’ll cover other options in future posts, but for now, let’s talk about the painting process. It’s not as apparent in the photos, but there were quite a few stains and also just an overall dinginess to the purse. It had lost its former beauty. It was grimy. It was lifeless. Here is how it started its life with me (it actually doesn’t look too bad in the photo…but in person it was a bit of a mess):
I set about the process of painting the purse (that’s right…PAINTING it!)
Follow me:
Step 1: Obtain or retain imperfect item. Contemplate possibilities. Consider chucking said item. Forget to put it out on trash day. Shrug. Continue contemplating. What to do? What to do?
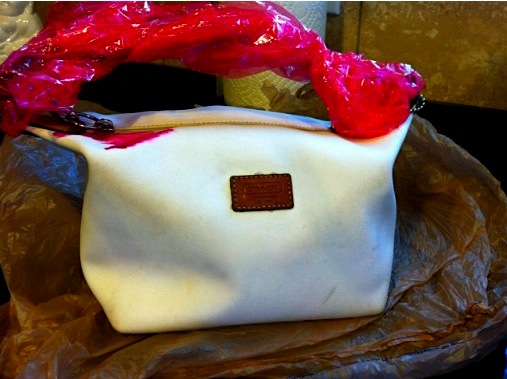
Step 2: Settle on painting purse with transparent fabric paint. The results are much like dye, but the application, for an item such as this are less problematic. The paint I used was left over from a similar project I had done a while back. I am typically not a hanger-oner of stuff in general, but I loved this product (which was not inexpensive, over ten dollars per bottle at the time) the bottles were still nearly full and I loved the results of the previous project, so I had kept it on hand ever since. I might have used different colors, had I been buying the paint specifically for this idea, but unsure as to whether the purse would survive the painting process I was unwilling to invest in new colors. Now that I know that it works, I would. The reason this paint works, as opposed to traditional fabric dye is that it is QUITE thick and does not need additional water. Water is what warps and bubbles fabric purses like this. While there was, of course, some moisture in the product, I was able to keep it to a minimum by applying it sparingly. I wrapped the handle and zipper pull in Saran Wrap to protect the leather just in case either happened to touch the paint before it was dry.
Here is a link to the fabric paint I used:
http://www.dickblick.com/products/pebeo-setacolor-fabric-paint/
(That link looks vaguely racy. Heh. But it’s not. Really. Click with confidence in the fact that it is rated G.)
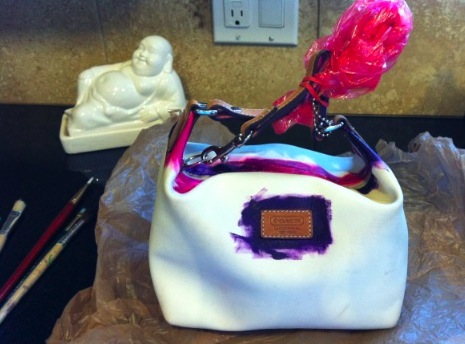
Step 3: Plow ahead. I started painting, using pink in some places and purple in others. Using two colors gives it a more easy going/slightly bohemian look, a little more depth and allows room for error, but one could do a solid color as well. I began by painting the areas I deemed riskiest, such as along the edge of the zipper, where the handle met the sides of the bag and around the leather Coach logo tag on the front. I used a small, thin, slanted brush. If you don’t have one in your arsenal of paintbrushes, a flat, slanted eyebrow/eyeliner brush works really well. The paint I used is water based and washed out of the brushes completely with some soap and water.
Step 4: Look at the mid-project hot mess and second guess yourself again, but then choose to soldier on. I continued painting, moving to a much larger flat brush. I painted each quadrant in eighths, switching up and alternating between the pink and purple. It is important to overlap the colors a little, but not too much. You can also paint the entire thing in pink and then go back with the purple, but this only works if your colors are similar, as the ones used here. Another way to go would be to use colors such as yellow and blue, and where they overlap you’ll get green. Just be sure to test the result beforehand.
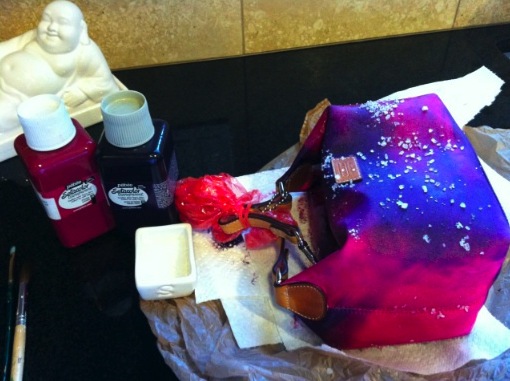
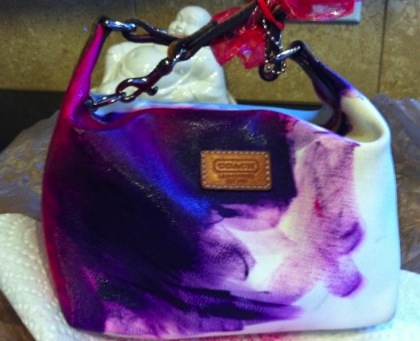
Step 5: This next step is optional. While the paint was still wet I sprinkled coarse sea salt on the purse. The effect can be as subtle or dramatic as you’d like. Add it quickly after painting and leave it on for a long time and you’ll get much more intensely mottled effect. The effect is achieved as the salt absorbs the paint on and around the spot where each granule lands. As each piece of salt is of a varying size, it gives an imperfect, hand done look. I put mine on after only a few minutes of dry time and left it on for less than 30 minutes.
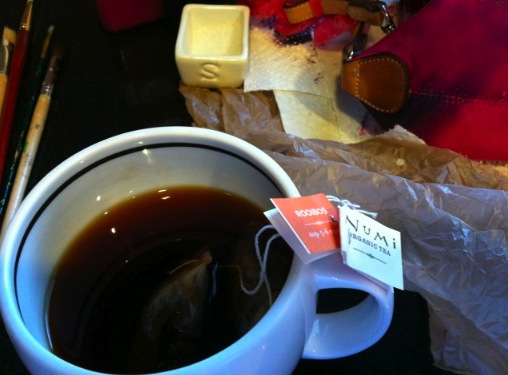
Step 6: While the salt is doing its job, stop, rest, have a cup of tea and ruminate on the parallels between purses and life.
Sometimes this happens in our relationships. Maybe you and your boss are often butting heads. Maybe your once adoring child became an angst ridden teenager awash in hormones and seemingly hell bent on convincing you that you’re the antichrist…or at least the anti-cool. Maybe a relationship with someone you love hit one too many speedbumps and you could never see that person as you once did. Look again. Maybe your boss will be a little easier to handle if you realize she might have struggles in her life about which you are unaware. Maybe your teenager doesn’t enjoy his misery any more than you do. (Let’s face it, being a teenager can suck.) Maybe your friend or loved one is ready and willing to replace the speedbumps with wide open highway…but they need for you to climb in the passenger seat and be a willing navigator. A little compassion goes a long way and a willingness to see beyond what’s broken and have faith in what’s worth saving might be all that’s needed. No one purse and no one person is perfect. Perhaps none of these relationships will be pristine white, shiny and new ever again…but if they have good bones and they’re meant to stand the test of time they will. That is, if, rather than expecting to erase the stains you choose to put them behind you. If you allow it. If you get creative. If you let go of what was and imagine what can be…and then follow it up with action. Be an active participant in the rejuvenation project. Expecting dramatic change from anyone with whom you interact without also putting some time in yourself is an expectation doomed for disappointment. Now, of course, you could keep going out and getting a new pristine “white purse” (spoiler alert…we’re not talking about purses anymore, people) every year…but no matter how careful you are, every white purse is going to become stained at some point. It may have been mistreated by previous owners, it may have hidden its blemishes behind designer logos, or maybe you just tossed it carelessly in the back of your closet and forgot about it. Remember that to someone we ALL were once a pristine white purse that became a little dingy. Don’t you want a second chance at life? Don’t you want a chance to be colorful; a chance to be seen as worthwhile as you really are?
So, rather than throwing out your current purse and buying a new one every six months, maybe colorful, beautiful and built to last is better anyway. I can tell you that I think it is (scroll down for a photo.)
Grab a paintbrush friends!
<3!
Laura
p.s.
Step 7: Step back and admire your work. It might not be right for just anyone, but I think it’s perfect! (FYI: It is less vivid and a bit more subtle in person…I have yet to master iPhone photos.)